Magic String
Principles
Background
At its core, it is a lightweight tool used to quickly generate mapping relationships between modified source code and original source code. It is simple to use and suitable for making minor source code modifications such as insertion, deletion, replacement, etc., while still being able to quickly generate sourcemap (source mapping).
Additional Points
Compared to recast, recast can directly manipulate the abstract syntax tree through parsers to achieve source code modification, which adds additional learning costs for familiarizing with AST operations and brings performance issues.
Usage in Various Tools
In
Vite,magic-stringparticipates in code rewriting work in plugins.In
Rollup,magic-stringmaintains the mapping relationship between chunks and source code. No matter how many times the source code is transpiled, the original position of the source code can be found. Meanwhile,magic-stringis used as a code modification tool forTree shaking.
Core Design
Determining mapping Information
The most basic point of code mapping is determining which characters need mapping processing. The mapping information in sourcemap can include the following types:
- Mapping word boundaries: Records
mappinginformation for code word boundaries. - Mapping coordinates for each character: The most precise
mappingrecording method, recordsmappinginformation for coordinates of each character in the code. - Mapping lexical position coordinates: Records
mappinginformation for lexical positions in the code. - Mapping line coordinates: The most basic
mappingrecording method, recordsmappinginformation for line numbers in the code. This cannot be reduced further, otherwise mapping anomalies may occur.
All four methods above can achieve mapping relationships between build artifacts and source code during debugging. However, the difference lies in the precision of mapping and the size of the generated sourcemap. magic string internally implements all the above methods but makes the following optimizations:
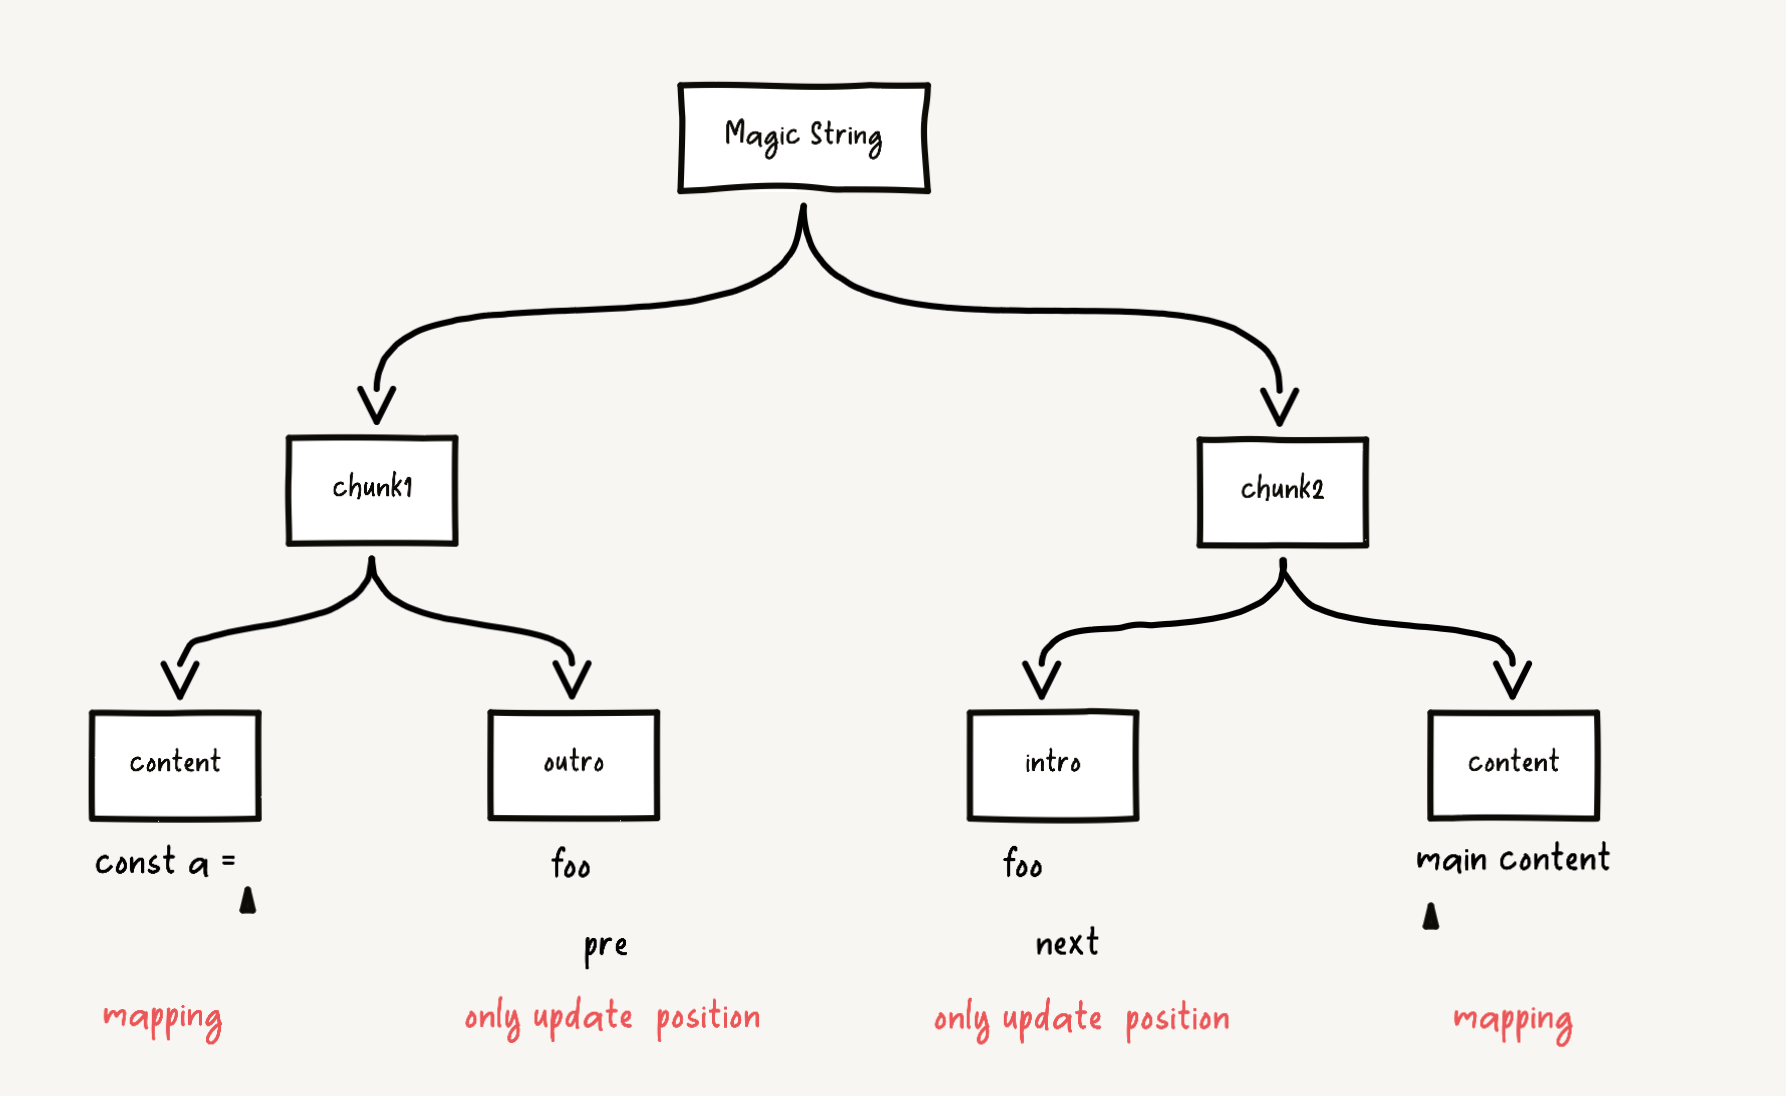
Only record position information for the
contentpart of eachchunk. Position information forchunk.introandchunk.outroparts is ignored in thesourcemap, only updating the line and column coordinates of the updated code.jsclass Mapping { advance(str) { if (!str) return; const lines = str.split('\n'); if (lines.length > 1) { for (let i = 0; i < lines.length - 1; i++) { this.generatedCodeLine++; this.raw[this.generatedCodeLine] = this.rawSegments = []; } this.generatedCodeColumn = 0; } this.generatedCodeColumn += lines[lines.length - 1].length; } }
If
contenthas been modified, record the starting coordinates of each line ofcontent.jsclass Mapping { addEdit(sourceIndex, content, loc, nameIndex) { if (content.length) { let contentLineEnd = content.indexOf('\n', 0); let previousContentLineEnd = -1; while (contentLineEnd >= 0) { const segment = [ this.generatedCodeColumn, sourceIndex, loc.line, loc.column ]; if (nameIndex >= 0) { segment.push(nameIndex); } this.rawSegments.push(segment);this.generatedCodeLine += 1; this.raw[this.generatedCodeLine] = this.rawSegments = []; this.generatedCodeColumn = 0; previousContentLineEnd = contentLineEnd; contentLineEnd = content.indexOf('\n', contentLineEnd + 1); } const segment = [ this.generatedCodeColumn, sourceIndex, loc.line, loc.column ]; if (nameIndex >= 0) { segment.push(nameIndex); } this.rawSegments.push(segment); this.advance(content.slice(previousContentLineEnd + 1)); } else if (this.pending) { this.rawSegments.push(this.pending); this.advance(content); } this.pending = null; } } If
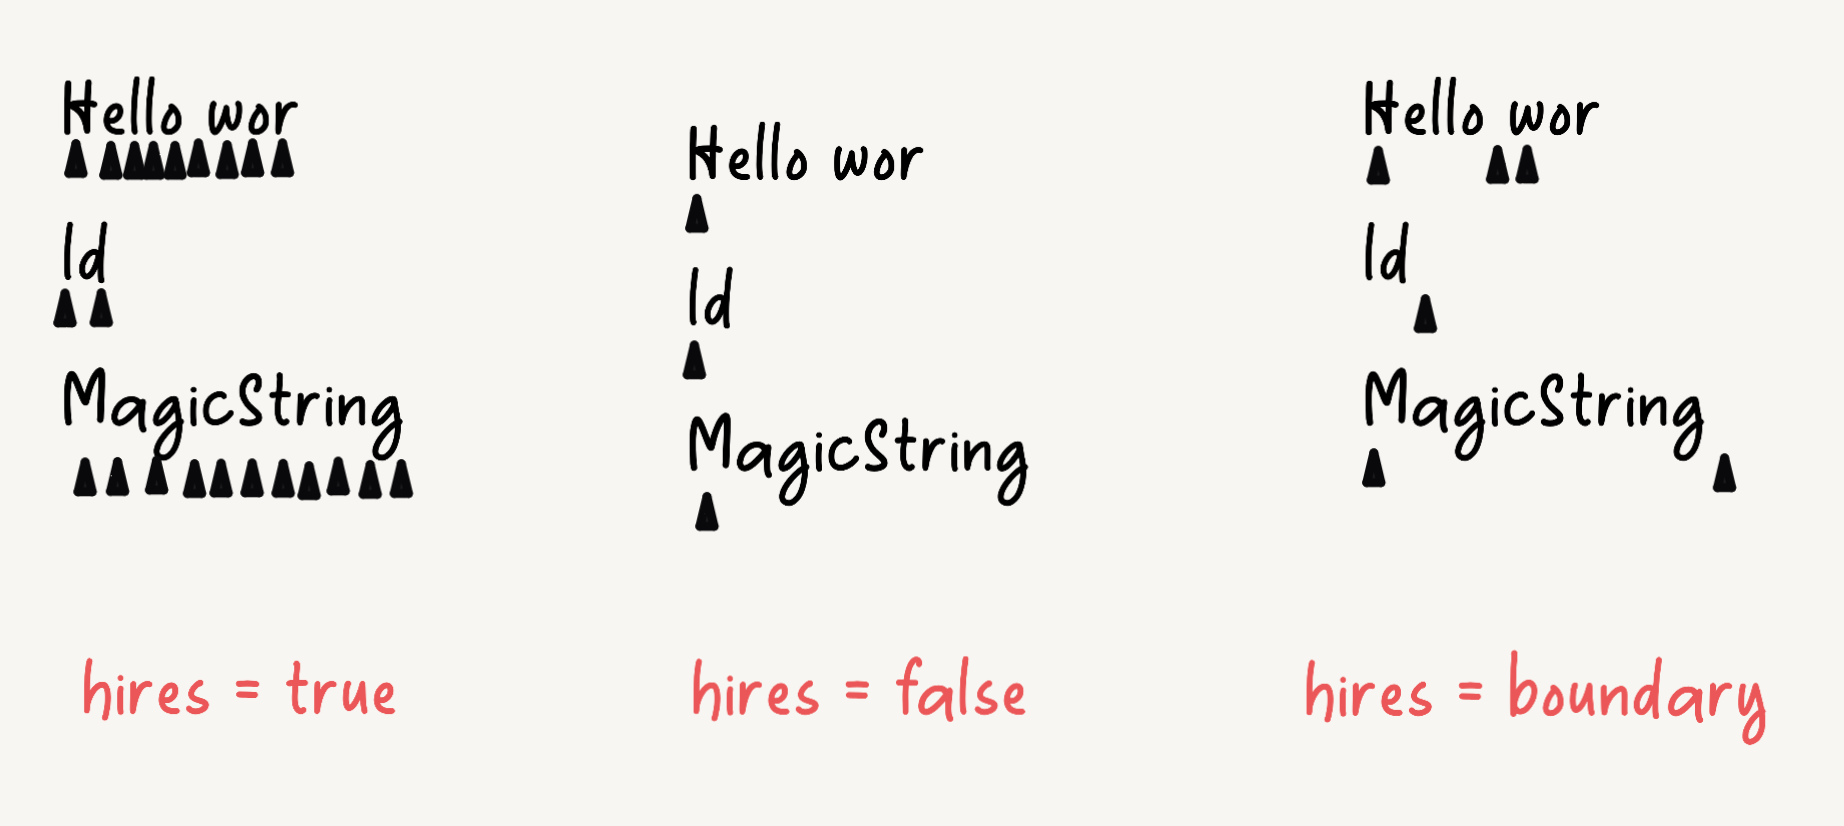
contenthas not been modified, while recording the starting coordinates of each line ofcontent, it will also record coordinate information for each character ofcontentthroughhiresandsourcemapLocationswith different precision levels.jsclass Mapping { addUneditedChunk( sourceIndex, chunk, original, loc, sourcemapLocations ) { let originalCharIndex = chunk.start; let first = true; // when iterating each char, check if it's in a word boundary let charInHiresBoundary = false; while (originalCharIndex < chunk.end) { if ( this.hires || first || sourcemapLocations.has(originalCharIndex) ) { const segment = [ this.generatedCodeColumn, sourceIndex, loc.line, loc.column ]; if (this.hires === 'boundary') { // in hires "boundary", group segments per word boundary than per char if (wordRegex.test(original[originalCharIndex])) { // for first char in the boundary found, start the boundary by pushing a segment if (!charInHiresBoundary) { this.rawSegments.push(segment); charInHiresBoundary = true; } } else { // for non-word char, end the boundary by pushing a segment this.rawSegments.push(segment); charInHiresBoundary = false; } } else { this.rawSegments.push(segment); } } if (original[originalCharIndex] === '\n') { loc.line += 1; loc.column = 0; this.generatedCodeLine += 1; this.raw[this.generatedCodeLine] = this.rawSegments = []; this.generatedCodeColumn = 0; first = true; } else { loc.column += 1; this.generatedCodeColumn += 1; first = false; } originalCharIndex += 1; } this.pending = null; } }tsinterface SourceMapOptions { /** * Whether the mapping should be high-resolution. * Hi-res mappings map every single character, meaning (for example) your devtools will always * be able to pinpoint the exact location of function calls and so on. * With lo-res mappings, devtools may only be able to identify the correct * line - but they're quicker to generate and less bulky. * You can also set `"boundary"` to generate a semi-hi-res mappings segmented per word boundary * instead of per character, suitable for string semantics that are separated by words. * If sourcemap locations have been specified with s.addSourceMapLocation(), they will be used here. */ hires?: boolean | 'boundary'; }sourcemapLocationscan specify recording positionsThe
hiresconfiguration option is related to the precision ofmappingrecording.When set to
true: Means high-precisionmappingrecording, requiring mapping for each character, able to accurately locate function calls and other content, but at the cost of generating a largemappingrecord.When set to
false(default): Means low-precisionmappingrecording, only recording line numbers, but faster to generate and smaller in size.When set to
boundary: Means semi-high-precisionmappingrecording, recording word boundaries instead of character boundaries, suitable for string semantics separated by words.

Usage of magic string in rollup and Source Map Processing Flow
magic string Instance and Source Map Processing Flow in rollup
In Rollup, each module has a magic string instance, which is used to maintain the mapping relationship between the modified code and the original source code.
class Module {
  async setSource({
    ast,
    code,
    customTransformCache,
    originalCode,
    originalSourcemap,
    resolvedIds,
    sourcemapChain,
    transformDependencies,
    transformFiles,
    ...moduleOptions
  }: TransformModuleJSON & {
    resolvedIds?: ResolvedIdMap;
    transformFiles?: EmittedFile[] | undefined;
  }): Promise<void> {
    // Other logic omitted
    this.magicString = new MagicString(code, {
      filename: (this.excludeFromSourcemap ? null : fileName)!, // don't include plugin helpers in sourcemap
      indentExclusionRanges: []
    });
    // Other logic omitted
  }
}The magic string instance is initialized in the setSource method. Note that the setSource method is executed after all load and transform hooks of plugins in Rollup, which means that the code at this point has already been processed by all plugins. Therefore, if the code structure changes, mapping information needs to be provided.
The simplest example is when Rollup uses the @rollup/plugin-typescript plugin to parse .ts modules, leveraging the capabilities provided by the typescript module to transpile .ts modules into .js modules. Since the code structure changes, mapping information will definitely be generated during the transpilation process.
// @rollup/plugin-typescript

function findTypescriptOutput(
  ts,
  parsedOptions,
  id,
  emittedFiles,
  tsCache
) {
  const emittedFileNames = ts.getOutputFileNames(
    parsedOptions,
    id,
    !ts.sys.useCaseSensitiveFileNames
  );
  const codeFile = emittedFileNames.find(isCodeOutputFile);
  const mapFile = emittedFileNames.find(isMapOutputFile);
  return {
    code: getEmittedFile(codeFile, emittedFiles, tsCache),
    map: getEmittedFile(mapFile, emittedFiles, tsCache),
    declarations: emittedFileNames.filter(
      name => name !== codeFile && name !== mapFile
    )
  };
}
function typescript() {
  return {
    name: 'typescript',
    async load(id) {
      if (!filter(id)) return null;
      this.addWatchFile(id);
      await watchProgramHelper.wait();
      const fileName = normalizePath(id);
      if (!parsedOptions.fileNames.includes(fileName)) {
        // Discovered new file that was not known when originally parsing the TypeScript config
        parsedOptions.fileNames.push(fileName);
      }
      const output = findTypescriptOutput(
        ts,
        parsedOptions,
        id,
        emittedFiles,
        tsCache
      );
      return output.code != null ? output : null;
    }
  };
}The @rollup/plugin-typescript plugin passes the mapping information corresponding to the transpiled .ts module to the .js module in the load hook to Rollup.
How does Rollup handle the map information?
The map information generated by the load hook (if the code structure changes) is stored in module.originalSourcemap.
The map information generated by the transform hook (if the code structure changes) is stored in module.sourcemapChain.
async function transform(
  source: SourceDescription,
  module: Module,
  pluginDriver: PluginDriver,
  log: LogHandler
): Promise<TransformModuleJSON> {
  const id = module.id;
  const sourcemapChain: DecodedSourceMapOrMissing[] = [];

  let originalSourcemap =
    source.map === null ? null : decodedSourcemap(source.map);
  const originalCode = source.code;
  let ast = source.ast;
  const transformDependencies: string[] = [];
  const emittedFiles: EmittedFile[] = [];
  let customTransformCache = false;
  const useCustomTransformCache = () => (customTransformCache = true);
  let pluginName = '';
  let currentSource = source.code;

  function transformReducer(
    this: PluginContext,
    previousCode: string,
    result: TransformResult,
    plugin: Plugin
  ): string {
    let code: string;
    let map:
      | string
      | ExistingRawSourceMap
      | { mappings: '' }
      | null
      | undefined;
    if (typeof result === 'string') {
      code = result;
    } else if (result && typeof result === 'object') {
      module.updateOptions(result);
      if (result.code == null) {
        if (result.map || result.ast) {
          log(
            LOGLEVEL_WARN,
            logNoTransformMapOrAstWithoutCode(plugin.name)
          );
        }
        return previousCode;
      }
      ({ code, map, ast } = result);
    } else {
      return previousCode;
    }

    // strict null check allows 'null' maps to not be pushed to the chain,
    // while 'undefined' gets the missing map warning
    if (map !== null) {
      sourcemapChain.push(
        decodedSourcemap(
          typeof map === 'string' ? JSON.parse(map) : map
        ) || {
          missing: true,
          plugin: plugin.name
        }
      );
    }

    currentSource = code;

    return code;
  }
  // Other logic omitted
  return {
    ast,
    code,
    customTransformCache,
    originalCode,
    originalSourcemap,
    sourcemapChain,
    transformDependencies
  };
}In the Module instance, the mapping information generated in the load phase (stored in originalSourcemap) and the mapping information generated in the transform phase (stored in sourcemapChain) are simply processed to prepare for generating the final mapping information later.
class Module {
  async setSource({
    ast,
    code,
    customTransformCache,
    originalCode,
    originalSourcemap,
    resolvedIds,
    sourcemapChain,
    transformDependencies,
    transformFiles,
    ...moduleOptions
  }: TransformModuleJSON & {
    resolvedIds?: ResolvedIdMap;
    transformFiles?: EmittedFile[] | undefined;
  }): Promise<void> {
    // We need to call decodedSourcemap on the input in case they were hydrated from json in the cache and don't
    // have the lazy evaluation cache configured. Right now this isn't enforced by the type system because the
    // RollupCache stores `ExistingDecodedSourcemap` instead of `ExistingRawSourcemap`
    this.originalSourcemap = decodedSourcemap(originalSourcemap);
    this.sourcemapChain = sourcemapChain.map(mapOrMissing =>
      mapOrMissing.missing ? mapOrMissing : decodedSourcemap(mapOrMissing)
    );

    // If coming from cache and this value is already fully decoded, we want to re-encode here to save memory.
    resetSourcemapCache(this.originalSourcemap, this.sourcemapChain);
  }
}Then back to the previous logic:
class Module {
  async setSource({
    ast,
    code,
    customTransformCache,
    originalCode,
    originalSourcemap,
    resolvedIds,
    sourcemapChain,
    transformDependencies,
    transformFiles,
    ...moduleOptions
  }: TransformModuleJSON & {
    resolvedIds?: ResolvedIdMap;
    transformFiles?: EmittedFile[] | undefined;
  }): Promise<void> {
    // Other logic omitted
    this.magicString = new MagicString(code, {
      filename: (this.excludeFromSourcemap ? null : fileName)!, // don't include plugin helpers in sourcemap
      indentExclusionRanges: []
    });
    // Other logic omitted
  }
}Now we know that the code stored in the above logic is the code processed by load and transform hooks. If the source code structure changes, the mapping information generated by the corresponding plugin is stored in the current module instance (module.originalSourcemap and module.sourcemapChain). Subsequent code modifications are performed on this code version, not necessarily the source code.
Structure of magic string and Maintaining Mapping Relationships

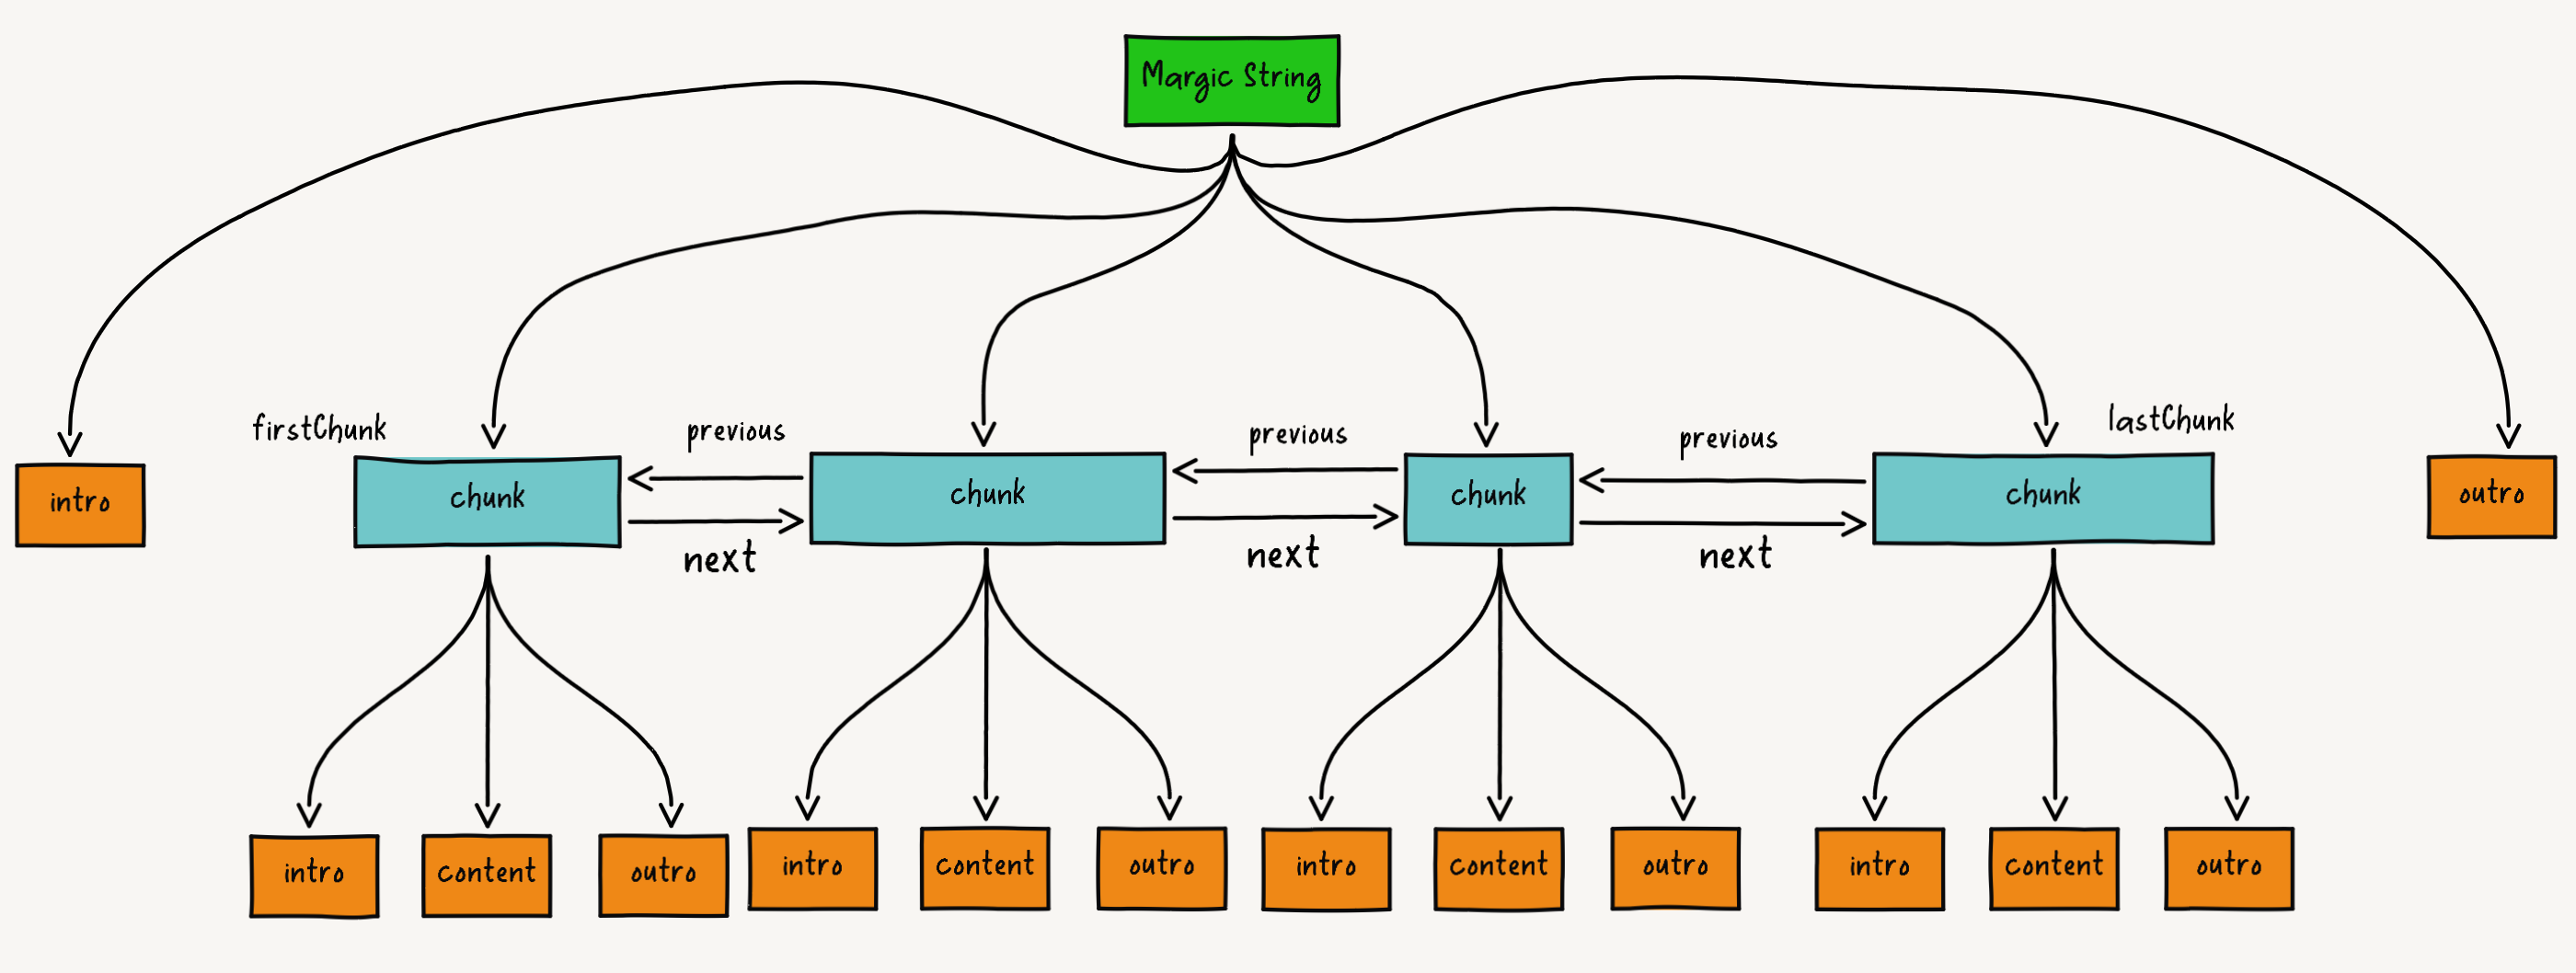
It can be seen that magic string instances maintain multiple chunk instances (attributes include intro (new content added at the beginning of the current chunk), content (content of the current chunk), outro (new content added at the end of the current chunk) three parts). They are connected through a doubly linked list. When modifying the source code, magic string creates a new chunk instance based on the modified interval, and stores the modified content in the content attribute of the new chunk instance.
The reason for designing as a linked list
The position information included in mapping:
- Line coordinate of the modified position
- Column coordinate of the modified position
- Path of the original copy
- Line coordinate of the source code position
- Column coordinate of the source code position
The meaning is: the mapping relationship between the modified position coordinates and the source code position under the path.
The first two pieces of information (line coordinate of the modified code and column coordinate of the modified code) are for the modified code, and it's easy to record the line and column coordinates of the modified code by traversing each character.
jsfor ( let originalCharIndex = 0; originalCharIndex < original.length; originalCharIndex++ ) { if (original[originalCharIndex] === '\n') { this.generatedCodeLine += 1; this.raw[this.generatedCodeLine] = this.rawSegments = []; this.generatedCodeColumn = 0; } else { this.generatedCodeColumn += 1; } }The path of the original copy is easy to get for
Rollup, which is the file path of the source code.Line coordinate of the original copy and column coordinate of the original copy are for the original code, which is what
magic stringneeds to maintain.So how does
magic stringmaintain the mapping relationship between the modified code and the original copy?It needs to determine that when modifying the characters in the interval
[a, b), no matter what the length of the modified characters is, the only thing that remains unchanged is the starting position coordinateaof the modification.magic stringtakes the length of the originalcodeas the total length of allchunkinstances. In other words, subsequent modifications are based on the originalcode, andmagic stringensures the mapping relationship between the modifiedcontentand the originalcodeby usingchunkform. Because every modification will ensure that the starting position of the modification relative to the originalcodeis correct. So it's easy to map the starting position coordinate (a) of the originalcodeto the starting position (a') of the modification.Note
[a, b)represents that the modification in this interval is relative to the original[a, b)interval, which means that this interval cannot be modified again. If a modification[a', b')is made in this interval, where(a' > a && a' < b) || (b' > a && b' < b), then it can be considered as a modification relative to the previous[a, b)interval, which is incorrect. Therefore, if this is done,magic stringwill display the following prompt:jsclass MagicString { _splitChunk(chunk, index) { if (chunk.edited && chunk.content.length) { // zero-length edited chunks are a special case (overlapping replacements) const loc = getLocator(this.original)(index); throw new Error( `Cannot split a chunk that has already been edited (${loc.line}:${loc.column} – "${chunk.original}")` ); } // Other logic omitted } }
magic string chunk Splitting Process
Take a simple example:
const magicString = new MagicString('const a = 1;');
magicString.update(6, 7, 'variableB');
console.log(magicString.toString()); // output: const variableB = 1;When
magic stringis first initialized, it only contains onechunkinstance, which stores the information of the originalcode.chunk(firstChunk | lastChunk)
jsconst chunk = { start: 0, end: 12, original: 'const a = 1;', content: 'const a = 1;', intro: '', outro: '', next: null, previous: null, toString() { return this.intro + this.content + this.outro; } }; magicString.firstChunk = chunk; magicString.lastChunk = chunk;According to the interval
[6, 7)to divide a newchunk2, at this timeMagicStringcontains twochunkinstances.chunk1(firstChunk) => chunk2(lastChunk)
jsconst chunk2 = { start: 6, end: 12, original: 'a = 1;', content: 'a = 1;', intro: '', outro: '', next: null, previous: chunk1, toString() { return this.intro + this.content + this.outro; } }; const chunk1 = { start: 0, end: 6, original: 'const ', content: 'const ', intro: '', outro: '', next: chunk2, previous: null, toString() { return this.intro + this.content + this.outro; } }; magicString.firstChunk = chunk1; magicString.lastChunk = chunk2;According to the interval
[6, 7)to divide a newchunk3, at this timemagic stringcontains threechunkinstances.chunk1(firstChunk) => chunk2 => chunk3(lastChunk)
jsconst chunk3 = { start: 7, end: 12, original: ' = 1;', content: ' = 1;', intro: '', outro: '', next: null, previous: chunk2, toString() { return this.intro + this.content + this.outro; } }; const chunk2 = { start: 6, end: 7, original: 'a', content: 'a', intro: '', outro: '', next: chunk3, previous: chunk1, toString() { return this.intro + this.content + this.outro; } }; const chunk1 = { start: 0, end: 6, original: 'const ', content: 'const ', intro: '', outro: '', next: chunk2, previous: null, toString() { return this.intro + this.content + this.outro; } }; magicString.firstChunk = chunk1; magicString.lastChunk = chunk3;Execute the
updateoperation,magic stringwill modify allchunksin the interval, in this example only one.jsconst chunk2 = { start: 6, end: 7, original: 'a', content: 'a', intro: '', outro: '', next: chunk3, previous: chunk1, toString() { return this.intro + this.content + this.outro; } }; chunk2.content = 'variableB';Execute the
toStringmethod, traverse eachchunkinmagic string, and concatenate thecontentof eachchunkto generate the final code.jsconst chunk3 = { start: 7, end: 12, original: ' = 1;', content: ' = 1;', intro: '', outro: '', next: null, previous: chunk2, toString() { return this.intro + this.content + this.outro; } }; const chunk2 = { start: 6, end: 7, original: 'a', content: 'variableB', intro: '', outro: '', next: chunk3, previous: chunk1, toString() { return this.intro + this.content + this.outro; } }; const chunk1 = { start: 0, end: 6, original: 'const ', content: 'const ', intro: '', outro: '', next: chunk2, previous: null, toString() { return this.intro + this.content + this.outro; } }; magicString.firstChunk = chunk1; magicString.lastChunk = chunk3; const result = chunk1.toString() + chunk2.toString() + chunk3.toString();
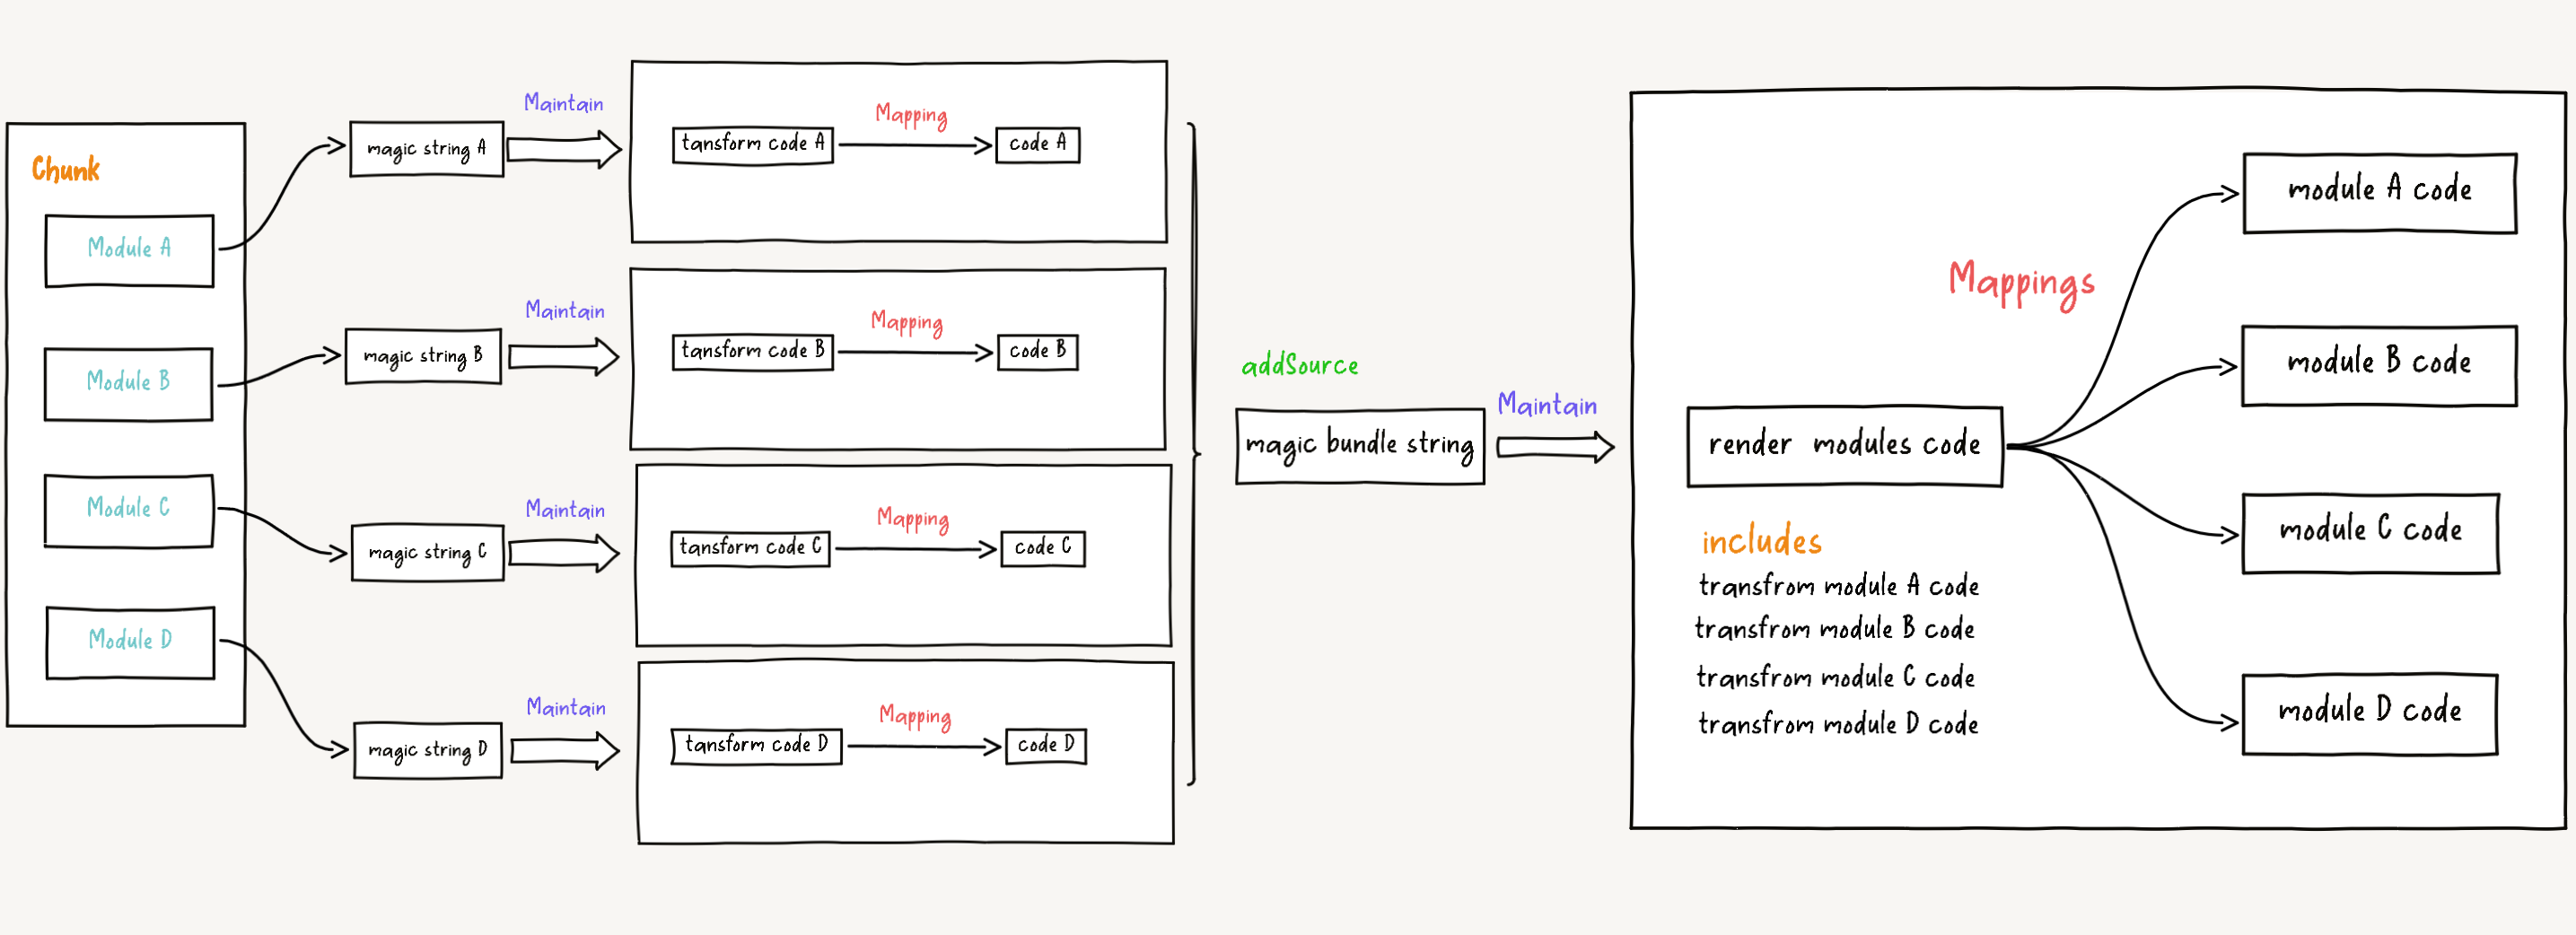
Magic String Bundle's Role
In Rollup, a chunk is composed of one or more modules, and each module maintains a magic string instance. In other words, a chunk corresponds to one or more magic string instances, as shown below:

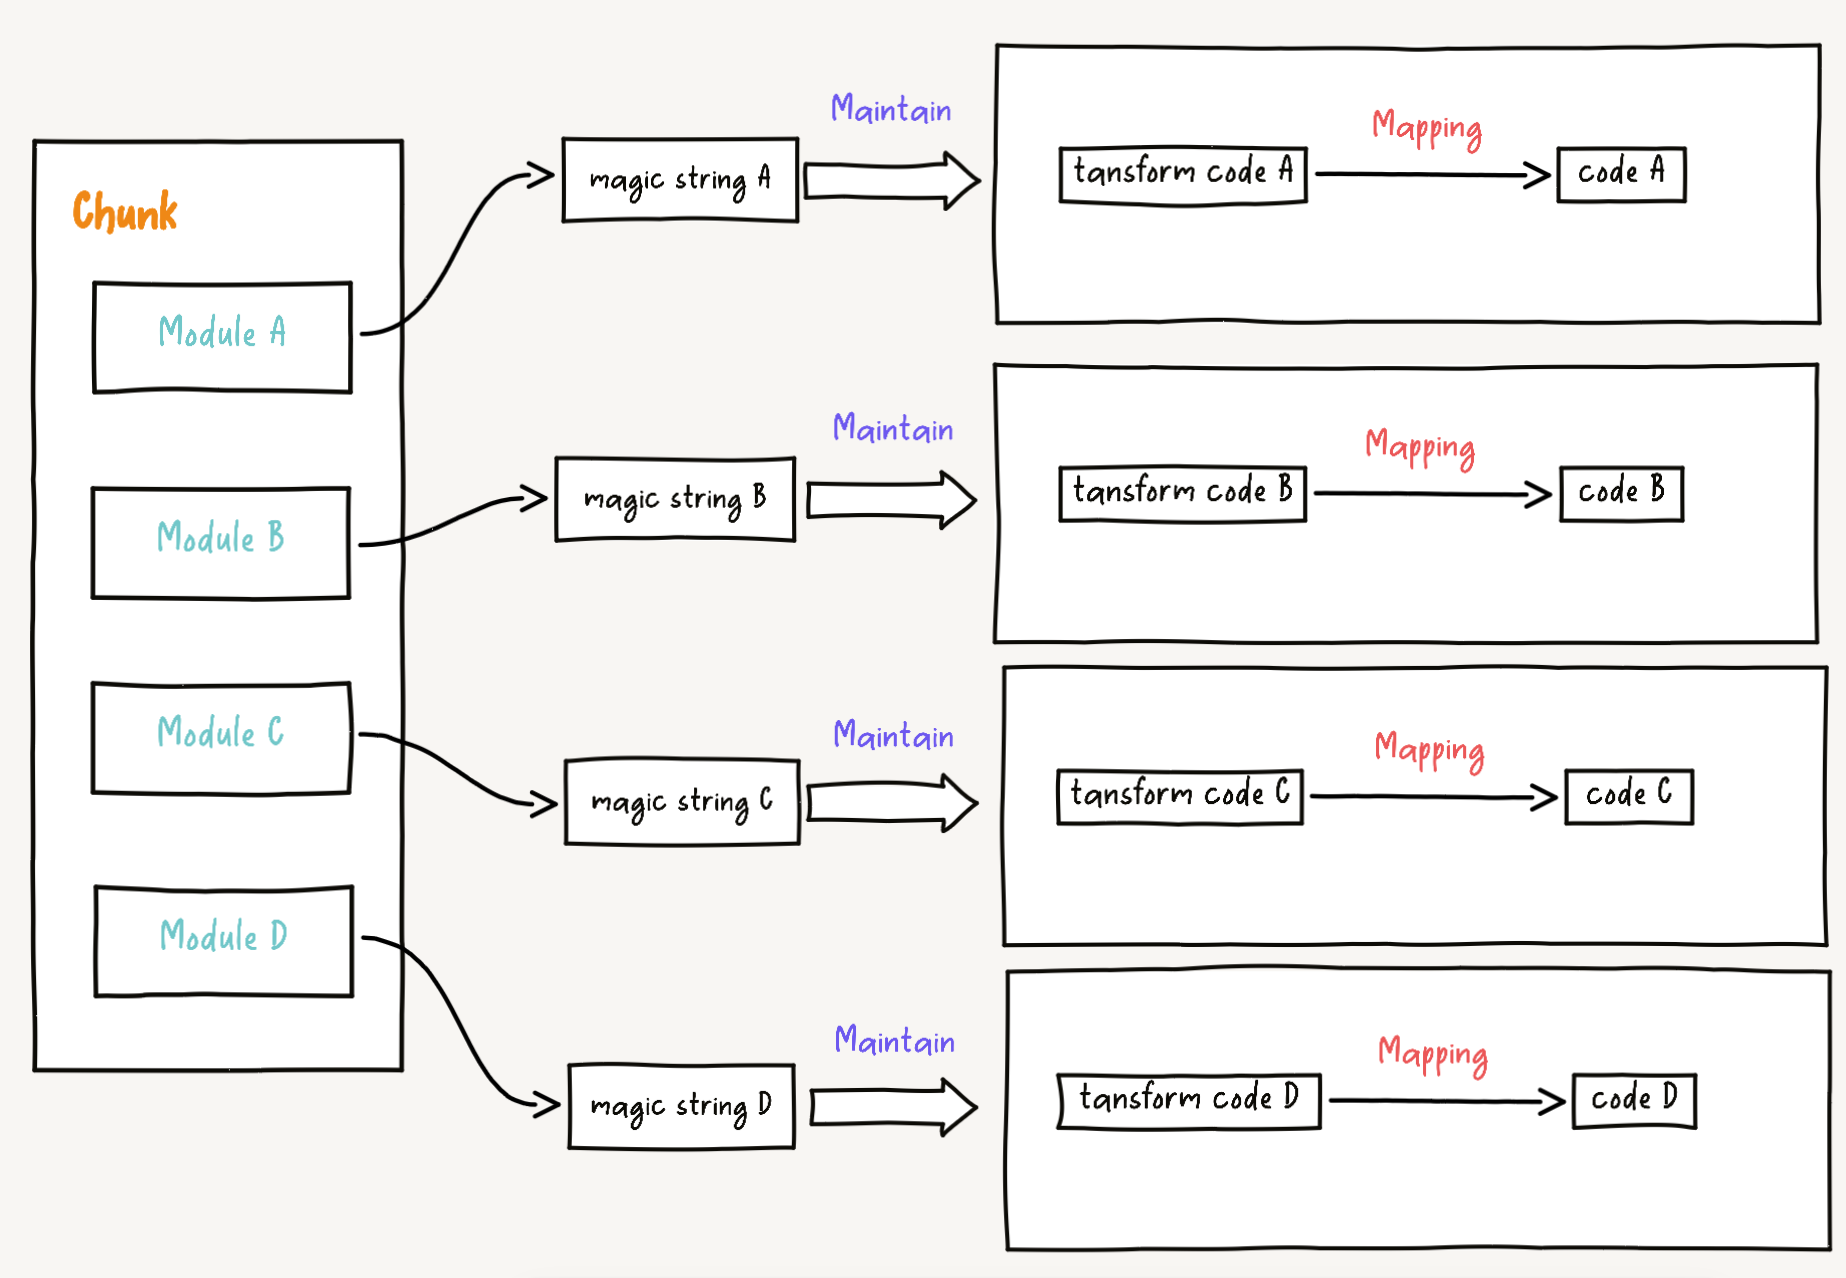
Each magic string is independent, which is for the mapping relationship between the module and the original code. However, in order to generate the mapping relationship between chunk and the original code, multiple magic string instances need to be merged. This is what magic string bundle is for. From the perspective of chunk, it merges multiple independent magic string instances to generate the final magic string instance (i.e., the mapping relationship between chunk and the original code).
Rollup Integration Logic for magic string bundle
Before this, let's understand how Rollup integrates magic string bundle. The following is a simplified logic of Rollup executing render chunks stage:
import { Bundle as MagicStringBundle } from 'magic-string';
class Module {
  render(options: RenderOptions): {
    source: MagicString;
    usesTopLevelAwait: boolean;
  } {
    const source = this.magicString.clone();
    this.ast!.render(source, options);
    source.trim();
    const { usesTopLevelAwait } = this.astContext;
    if (
      usesTopLevelAwait &&
      options.format !== 'es' &&
      options.format !== 'system'
    ) {
      return error(
        logInvalidFormatForTopLevelAwait(this.id, options.format)
      );
    }
    return { source, usesTopLevelAwait };
  }
}
class Chunk {
  private renderModules(fileName: string) {
    const magicString = new MagicStringBundle({ separator: `${n}${n}` });
    for (const module of orderedModules) {
      let source: MagicString | undefined;
      if (module.isIncluded() || includedNamespaces.has(module)) {
        const rendered = module.render(renderOptions);
        ({ source } = rendered);
        renderedLength = source.length();
        if (renderedLength) {
          magicString.addSource(source);
        }
        const namespace = module.namespace;
        if (includedNamespaces.has(module)) {
          const rendered = namespace.renderBlock(renderOptions);
          if (namespace.renderFirst()) hoistedSource += n + rendered;
          else magicString.addSource(new MagicString(rendered));
        }
      }
    }
  }
}It can be seen that Rollup will traverse the orderedModules in renderModules to obtain executable code (magic string) by calling module.render for code (magic string) modification and pruning operations. magic string bundle will add the optimized code (magic string) of each module through the addSource method, which represents the mapping relationship between the modified code (tree-sharking pruning and modifying code) and the original code.
class Bundle {
  addSource(source) {
    if (source instanceof MagicString) {
      return this.addSource({
        content: source,
        filename: source.filename,
        separator: this.separator
      });
    }

    if (!isObject(source) || !source.content) {
      throw new Error(
        'bundle.addSource() takes an object with a `content` property, which should be an instance of MagicString, and an optional `filename`'
      );
    }

    [
      'filename',
      'ignoreList',
      'indentExclusionRanges',
      'separator'
    ].forEach(option => {
      if (!hasOwnProp.call(source, option))
        source[option] = source.content[option];
    });

    if (source.separator === undefined) {
      // TODO there's a bunch of this sort of thing, needs cleaning up
      source.separator = this.separator;
    }

    if (source.filename) {
      if (
        !hasOwnProp.call(this.uniqueSourceIndexByFilename, source.filename)
      ) {
        this.uniqueSourceIndexByFilename[source.filename] =
          this.uniqueSources.length;
        this.uniqueSources.push({
          filename: source.filename,
          content: source.content.original
        });
      } else {
        const uniqueSource =
          this.uniqueSources[
            this.uniqueSourceIndexByFilename[source.filename]
          ];
        if (source.content.original !== uniqueSource.content) {
          throw new Error(
            `Illegal source: same filename (${source.filename}), different contents`
          );
        }
      }
    }

    this.sources.push(source);
    return this;
  }
}The addSource method is simple, collecting the optimized magic string instances of all modules in the chunk as the source of magic string bundle and storing them in the sources array. At the same time, uniqueSourceIndexByFilename collects the path of the original copy file, preparing for generating mapping later.
Generating mapping Process
class Bundle {
  generateDecodedMap(options = {}) {
    const names = [];
    let x_google_ignoreList = undefined;
    this.sources.forEach(source => {
      Object.keys(source.content.storedNames).forEach(name => {
        if (!~names.indexOf(name)) names.push(name);
      });
    });

    const mappings = new Mappings(options.hires);

    if (this.intro) {
      mappings.advance(this.intro);
    }

    this.sources.forEach((source, i) => {
      if (i > 0) {
        mappings.advance(this.separator);
      }

      const sourceIndex = source.filename
        ? this.uniqueSourceIndexByFilename[source.filename]
        : -1;
      const magicString = source.content;
      const locate = getLocator(magicString.original);

      if (magicString.intro) {
        mappings.advance(magicString.intro);
      }

      magicString.firstChunk.eachNext(chunk => {
        const loc = locate(chunk.start);

        if (chunk.intro.length) mappings.advance(chunk.intro);

        if (source.filename) {
          if (chunk.edited) {
            mappings.addEdit(
              sourceIndex,
              chunk.content,
              loc,
              chunk.storeName ? names.indexOf(chunk.original) : -1
            );
          } else {
            mappings.addUneditedChunk(
              sourceIndex,
              chunk,
              magicString.original,
              loc,
              magicString.sourcemapLocations
            );
          }
        } else {
          mappings.advance(chunk.content);
        }

        if (chunk.outro.length) mappings.advance(chunk.outro);
      });

      if (magicString.outro) {
        mappings.advance(magicString.outro);
      }

      if (source.ignoreList && sourceIndex !== -1) {
        if (x_google_ignoreList === undefined) {
          x_google_ignoreList = [];
        }
        x_google_ignoreList.push(sourceIndex);
      }
    });

    return {
      file: options.file ? options.file.split(/[/\\]/).pop() : undefined,
      sources: this.uniqueSources.map(source => {
        return options.file
          ? getRelativePath(options.file, source.filename)
          : source.filename;
      }),
      sourcesContent: this.uniqueSources.map(source => {
        return options.includeContent ? source.content : null;
      }),
      names,
      mappings: mappings.raw,
      x_google_ignoreList
    };
  }
}It can be seen that the implementation logic is simple. Initialize magic string at the dimension of chunk, traverse the magic string added in the above addSource (which maintains the mapping relationship between the transpiled module and the original code), and generate the mapping relationship between chunk and the original code.

So far, through magic string bundle, multiple magic string instances are merged to generate magic string instances (i.e., the mapping relationship between chunk and the original code). But it's not over yet. As mentioned in the introduction to the above paragraph, the original code is obtained through load and transform hooks of rollup, and the mapping information of the original code is stored in the originalSourcemap and sourcemapChain of the module. Therefore, at this point, we need to use these two pieces of information to generate the final mapping information.
Rollup Generating Final mapping Information
In the logic of render chunks, all modules in the chunk will be executed, creating a magic bundle string instance to collect the executable code (magic string) of the chunk, and generate the mapping relationship between chunk and the original code.
Then the logic of transform chunks will be executed, where the renderChunk plugin hook will be triggered. Note that the renderChunk hook may also change the code structure, so there may be a possibility of generating map. Therefore, similar to the transform plugin hook, the newly generated map will be collected in sourcemapChain to prepare for generating the final mapping.
function transformChunk(
  magicString: MagicStringBundle,
  fileName: string,
  usedModules: Module[],
  chunkGraph: Record<string, RenderedChunk>,
  options: NormalizedOutputOptions,
  outputPluginDriver: PluginDriver,
  log: LogHandler
) {
  const map: SourceMap | null = null;
  const sourcemapChain: DecodedSourceMapOrMissing[] = [];
  const code = await outputPluginDriver.hookReduceArg0(
    'renderChunk',
    [
      magicString.toString(),
      chunkGraph[fileName],
      options,
      { chunks: chunkGraph }
    ],
    (code, result, plugin) => {
      if (result == null) return code;

      if (typeof result === 'string')
        result = {
          code: result,
          map: undefined
        };

      // strict null check allows 'null' maps to not be pushed to the chain, while 'undefined' gets the missing map warning
      if (result.map !== null) {
        const map = decodedSourcemap(result.map);
        sourcemapChain.push(map || { missing: true, plugin: plugin.name });
      }

      return result.code;
    }
  );
  // Other logic omitted
}rollup will then merge all map through the collapseSourcemaps method to generate the final mapping.
function transformChunk(
  magicString: MagicStringBundle,
  fileName: string,
  usedModules: Module[],
  chunkGraph: Record<string, RenderedChunk>,
  options: NormalizedOutputOptions,
  outputPluginDriver: PluginDriver,
  log: LogHandler
) {
  // Other logic omitted
  if (sourcemap) {
    timeStart('sourcemaps', 3);

    let resultingFile: string;
    if (file) resultingFile = resolve(sourcemapFile || file);
    else if (dir) resultingFile = resolve(dir, fileName);
    else resultingFile = resolve(fileName);

    const decodedMap = magicString.generateDecodedMap({});
    map = collapseSourcemaps(
      resultingFile,
      decodedMap,
      usedModules,
      sourcemapChain,
      sourcemapExcludeSources,
      log
    );
    for (
      let sourcesIndex = 0;
      sourcesIndex < map.sources.length;
      ++sourcesIndex
    ) {
      let sourcePath = map.sources[sourcesIndex];
      const sourcemapPath = `${resultingFile}.map`;
      const ignoreList = sourcemapIgnoreList(sourcePath, sourcemapPath);
      if (typeof ignoreList !== 'boolean') {
        error(
          logFailedValidation(
            'sourcemapIgnoreList function must return a boolean.'
          )
        );
      }
      if (ignoreList) {
        if (map.x_google_ignoreList === undefined) {
          map.x_google_ignoreList = [];
        }
        if (!map.x_google_ignoreList.includes(sourcesIndex)) {
          map.x_google_ignoreList.push(sourcesIndex);
        }
      }
      if (sourcemapPathTransform) {
        sourcePath = sourcemapPathTransform(sourcePath, sourcemapPath);
        if (typeof sourcePath !== 'string') {
          error(
            logFailedValidation(
              `sourcemapPathTransform function must return a string.`
            )
          );
        }
      }
      map.sources[sourcesIndex] = normalize(sourcePath);
    }

    timeEnd('sourcemaps', 3);
  }
  return {
    code,
    map
  };
}Where const decodedMap = magicString.generateDecodedMap({}) is the mapping information of magic string bundle, representing the mapping relationship between chunk and the original code.
Flowchart for Generating magic string bundle
Taking .ts module as an example, generating magic string bundle mapping information.

The collapseSourcemaps method is for merging map generated by load, transform and renderChunk hooks to generate the final mapping information. Then let's take a look at the merging logic in collapseSourcemaps.
function getCollapsedSourcemap(
  id: string,
  originalCode: string,
  originalSourcemap: ExistingDecodedSourceMap | null,
  sourcemapChain: readonly DecodedSourceMapOrMissing[],
  linkMap: (source: Source | Link, map: DecodedSourceMapOrMissing) => Link
): Source | Link {
  let source: Source | Link;

  if (originalSourcemap) {
    const sources = originalSourcemap.sources;
    const sourcesContent = originalSourcemap.sourcesContent || [];
    const directory = dirname(id) || '.';
    const sourceRoot = originalSourcemap.sourceRoot || '.';

    const baseSources = sources.map(
      (source, index) =>
        new Source(
          resolve(directory, sourceRoot, source),
          sourcesContent[index]
        )
    );
    source = new Link(originalSourcemap, baseSources);
  } else {
    source = new Source(id, originalCode);
  }
  return sourcemapChain.reduce(linkMap, source);
}
function getLinkMap(log: LogHandler) {
  return function linkMap(
    source: Source | Link,
    map: DecodedSourceMapOrMissing
  ): Link {
    if (!map.missing) {
      return new Link(map, [source]);
    }

    log(LOGLEVEL_WARN, logSourcemapBroken(map.plugin));

    return new Link(
      {
        mappings: [],
        names: []
      },
      [source]
    );
  };
}
function collapseSourcemaps(
  file: string,
  map: Omit<DecodedSourceMap, 'sourcesContent'> & {
    sourcesContent: (string | null)[];
  },
  modules: readonly Module[],
  bundleSourcemapChain: readonly DecodedSourceMapOrMissing[],
  excludeContent: boolean | undefined,
  log: LogHandler
): SourceMap {
  const linkMap = getLinkMap(log);
  const moduleSources = modules
    .filter(module => !module.excludeFromSourcemap)
    .map(module =>
      getCollapsedSourcemap(
        module.id,
        module.originalCode,
        module.originalSourcemap,
        module.sourcemapChain,
        linkMap
      )
    );

  const link = new Link(map, moduleSources);
  const source = bundleSourcemapChain.reduce(linkMap, link);
  // Other logic omitted
}The flow of the above source code is to organize map generated by load, transform and renderChunk hooks.
The link instance in the source code corresponds to the blue part in the diagram, and the source instance corresponds to the purple part in the diagram.
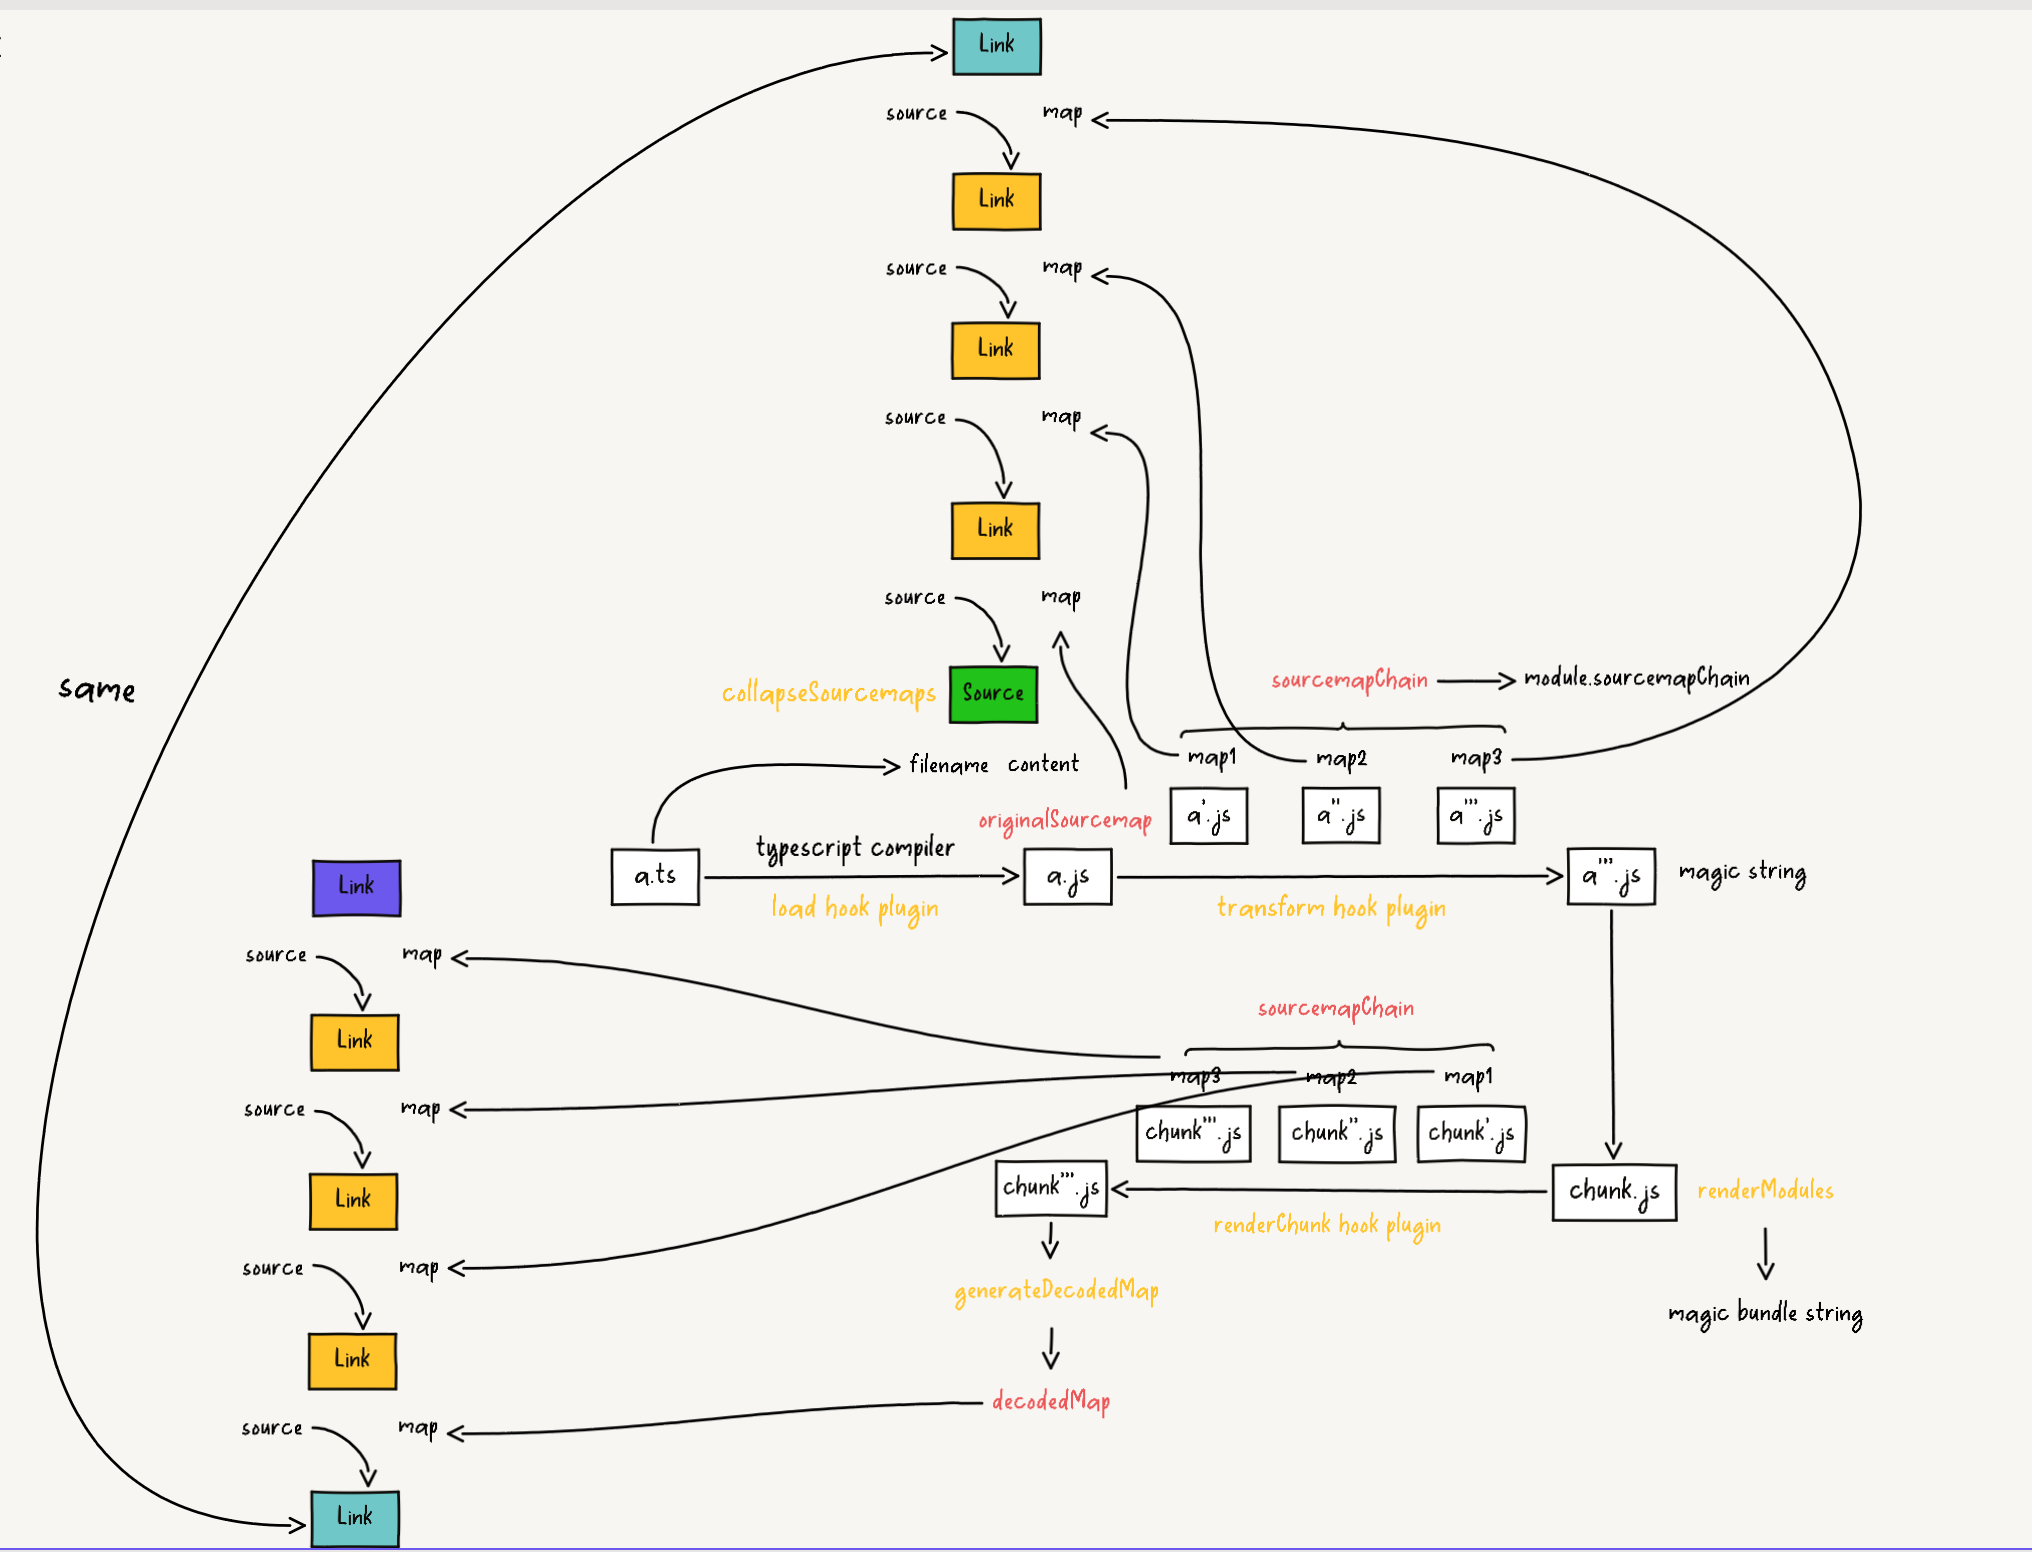
It can be seen from the diagram that the generated map is relative to the previous state map. Unfortunately, we don't need these intermediate map, but only the final product relative to the source code map. By organizing the mapping relationship between map and map, and following the map chain structure as shown in the diagram, it's easy to generate the final product relative to the source code map. This is the implementation logic of source.traceMappings() in the source code.
function collapseSourcemaps(
  file: string,
  map: Omit<DecodedSourceMap, 'sourcesContent'> & {
    sourcesContent: (string | null)[];
  },
  modules: readonly Module[],
  bundleSourcemapChain: readonly DecodedSourceMapOrMissing[],
  excludeContent: boolean | undefined,
  log: LogHandler
): SourceMap {
  // Other logic omitted
  let { sources, sourcesContent, names, mappings } = source.traceMappings();

  if (file) {
    const directory = dirname(file);
    sources = sources.map((source: string) => relative(directory, source));
    file = basename(file);
  }

  sourcesContent = (excludeContent ? null : sourcesContent) as string[];

  for (const module of modules) {
    resetSourcemapCache(module.originalSourcemap, module.sourcemapChain);
  }

  return new SourceMap({ file, mappings, names, sources, sourcesContent });
}Let's take a quick look at the implementation of traceMappings.
class Source {
  traceSegment(
    line: number,
    column: number,
    name: string
  ): SourceMapSegmentObject {
    return { column, line, name, source: this };
  }
}

class Link {
  traceMappings() {
    const sources: string[] = [];
    const sourceIndexMap = new Map<string, number>();
    const sourcesContent: string[] = [];
    const names: string[] = [];
    const nameIndexMap = new Map<string, number>();

    const mappings = [];

    for (const line of this.mappings) {
      const tracedLine: SourceMapSegment[] = [];

      for (const segment of line) {
        if (segment.length === 1) continue;
        const source = this.sources[segment[1]];
        if (!source) continue;

        const traced = source.traceSegment(
          segment[2],
          segment[3],
          segment.length === 5 ? this.names[segment[4]] : ''
        );

        if (traced) {
          const {
            column,
            line,
            name,
            source: { content, filename }
          } = traced;
          let sourceIndex = sourceIndexMap.get(filename);
          if (sourceIndex === undefined) {
            sourceIndex = sources.length;
            sources.push(filename);
            sourceIndexMap.set(filename, sourceIndex);
            sourcesContent[sourceIndex] = content;
          } else if (sourcesContent[sourceIndex] == null) {
            sourcesContent[sourceIndex] = content;
          } else if (
            content != null &&
            sourcesContent[sourceIndex] !== content
          ) {
            return error(logConflictingSourcemapSources(filename));
          }

          const tracedSegment: SourceMapSegment = [
            segment[0],
            sourceIndex,
            line,
            column
          ];

          if (name) {
            let nameIndex = nameIndexMap.get(name);
            if (nameIndex === undefined) {
              nameIndex = names.length;
              names.push(name);
              nameIndexMap.set(name, nameIndex);
            }

            (tracedSegment as SourceMapSegment)[4] = nameIndex;
          }

          tracedLine.push(tracedSegment);
        }
      }

      mappings.push(tracedLine);
    }

    return { mappings, names, sources, sourcesContent };
  }
  traceSegment(
    line: number,
    column: number,
    name: string
  ): SourceMapSegmentObject | null {
    const segments = this.mappings[line];
    if (!segments) return null;

    // binary search through segments for the given column
    let searchStart = 0;
    let searchEnd = segments.length - 1;

    while (searchStart <= searchEnd) {
      const m = (searchStart + searchEnd) >> 1;
      const segment = segments[m];

      // If a sourcemap does not have sufficient resolution to contain a
      // necessary mapping, e.g. because it only contains line information, we
      // use the best approximation we could find
      if (segment[0] === column || searchStart === searchEnd) {
        if (segment.length == 1) return null;
        const source = this.sources[segment[1]];
        if (!source) return null;

        return source.traceSegment(
          segment[2],
          segment[3],
          segment.length === 5 ? this.names[segment[4]] : name
        );
      }
      if (segment[0] > column) {
        searchEnd = m - 1;
      } else {
        searchStart = m + 1;
      }
    }

    return null;
  }
}The logic is simple. For each position information, it recursively determines the position information of the current map in the next map (here, the position information is determined through binary search optimization) until the recursive search reaches the Source instance, which is the final exit. The position information at this point is relative to the source code, which is exactly what we need. After traversing, the generated mappings information (mapping relationship between chunk and source code) is fed into the SourceMap constructor in the SourceMap constructor to generate the final map. The SourceMap in the constructor performs encoding operations on the above mappings position information.
import { encode } from '@jridgewell/sourcemap-codec';
class SourceMap {
  constructor(properties) {
    this.version = 3;
    this.file = properties.file;
    this.sources = properties.sources;
    this.sourcesContent = properties.sourcesContent;
    this.names = properties.names;
    this.mappings = encode(properties.mappings);
    if (typeof properties.x_google_ignoreList !== 'undefined') {
      this.x_google_ignoreList = properties.x_google_ignoreList;
    }
  }
}So far, the sourcemap mapping work has been completed.
Source Code Parsing
Summary
MagicString represents each modification with a chunk, and the generated chunk is connected through a doubly linked list. Each chunk contains intro (new content added at the beginning of the current chunk), content (content of the current chunk), outro (new content added at the end of the current chunk) three parts. The final new string is generated by concatenating all chunk instances, as shown in the following example:
firstChunk <=> chunk <=> lastChunk

newString =
    firstChunk.intro + firstChunk.content + firstChunk.outro +
    chunk.intro + chunk.content + chunk.outro +
lastChunk.intro + lastChunk.content + lastChunk.outro;Principle Analysis
Implementation of
MagicStringInstantiation
jsexport class MagicString { constructor(string, options = {}) { // The chunk instance of the initial source code string const chunk = new Chunk(0, string.length, string); Object.defineProperties(this, { // Original string, subsequent operations do not change. original: { writable: true, value: string }, // String appended to the end of the original string (content to be added after the original string) outro: { writable: true, value: '' }, // String prepended to the original string (content to be added before the original string) intro: { writable: true, value: '' }, // The first chunk instance firstChunk: { writable: true, value: chunk }, // The last chunk instance lastChunk: { writable: true, value: chunk }, // The last searched chunk instance, used for optimizing chunk search operations. lastSearchedChunk: { writable: true, value: chunk }, // Get the chunk instance starting with index. byStart: { writable: true, value: {} }, // Get the chunk instance ending with index. byEnd: { writable: true, value: {} }, // File name filename: { writable: true, value: options.filename }, // Indentation exclusion range indentExclusionRanges: { writable: true, value: options.indentExclusionRanges }, // Position information of sourcemap sourcemapLocations: { writable: true, value: new BitSet() }, // Stored names storedNames: { writable: true, value: {} }, // Indent string indentStr: { writable: true, value: undefined }, ignoreList: { writable: true, value: options.ignoreList } }); if (DEBUG) { Object.defineProperty(this, 'stats', { value: new Stats() }); } // Initialize the position information of the first chunk. this.byStart[0] = chunk; this.byEnd[string.length] = chunk; } }MagicStringcontains many methods, we'll take an implementation ofupdatefor specific analysis, other methods are similar.MagicString.update
jsfunction update(start, end, content, options) { // Ensure that the replacement content is a string. if (typeof content !== 'string') throw new TypeError('replacement content must be a string'); // Process negative starting and ending positions to ensure they are positive. while (start < 0) start += this.original.length; while (end < 0) end += this.original.length; // Ensure that the ending index is within range, if the ending index meets the requirements, the starting position must also meet expectations. if (end > this.original.length) throw new Error('end is out of bounds'); // Check if the update range is zero length, if so, skip directly. if (start === end) throw new Error( 'Cannot overwrite a zero-length range – use appendLeft or prependRight instead' ); if (DEBUG) this.stats.time('overwrite'); /** * Start and end positions are split into new chunks, * ensuring that there is a chunk starting from start and ending at end, * to prepare for subsequent operations. */ this._split(start); this._split(end); // Process options parameters. if (options === true) { if (!warned.storeName) { console.warn( 'The final argument to magicString.overwrite(...) should be an options object. See https://github.com/rich-harris/magic-string' ); warned.storeName = true; } options = { storeName: true }; } // Get storeName and overwrite options. const storeName = options !== undefined ? options.storeName : false; const overwrite = options !== undefined ? options.overwrite : false; // If storeName is needed, store the original content in storedNames. if (storeName) { const original = this.original.slice(start, end); Object.defineProperty(this.storedNames, original, { writable: true, value: true, enumerable: true }); } // Get the starting chunk and ending chunk to be modified. const first = this.byStart[start]; const last = this.byEnd[end]; // If first exists, then only the content of the start to end interval is saved in first chunk, and all other chunks are modified to empty strings. if (first) { let chunk = first; while (chunk !== last) { if (chunk.next !== this.byStart[chunk.end]) { throw new Error('Cannot overwrite across a split point'); } chunk = chunk.next; chunk.edit('', false); } first.edit(content, storeName, !overwrite); } else { // must be inserting at the end const newChunk = new Chunk(start, end, '').edit( content, storeName ); // TODO last chunk in the array may not be the last chunk, if it's moved... last.next = newChunk; newChunk.previous = last; } if (DEBUG) this.stats.timeEnd('overwrite'); return this; }It can be seen that when
updateis executed,startandendindices are processed to splitchunk, which is the core ofmagic-stringpackage. That is, the entire source code is composed of single or multiplechunkinstances, and every operation will ensure that the index position exists in the splitchunk. Then let's take a look at how thechunkis split.MagicString._split
jsfunction _split(index) { // If the index position exists in the chunk instance, no need to split, return the already split chunk. if (this.byStart[index] || this.byEnd[index]) return; if (DEBUG) this.stats.time('_split'); // Mark lastSearchedChunk to remember the position of the target chunk. let chunk = this.lastSearchedChunk; // Determine whether the new chunk to be split is behind or in front of the current marked chunk. const searchForward = index > chunk.end; while (chunk) { // If the index to be split is within the current chunk, execute the chunk splitting process. if (chunk.contains(index)) return this._splitChunk(chunk, index); // If the target chunk is behind lastSearchedChunk, search later, otherwise search earlier. chunk = searchForward ? this.byStart[chunk.end] : this.byEnd[chunk.start]; } }It can be seen that the splitting steps are in
this._splitChunk(chunk, index), and further analysis is continued.MagicString._splitChunk
jsfunction _splitChunk(chunk, index) { // If the current chunk has been modified and contains content, stop the current process. if (chunk.edited && chunk.content.length) { // zero-length edited chunks are a special case (overlapping replacements) const loc = getLocator(this.original)(index); throw new Error( `Cannot split a chunk that has already been edited (${loc.line}:${loc.column} – "${chunk.original}")` ); } /** * Split the chunk at index, return a new chunk starting at index. * That is newChunk.start === index. */ const newChunk = chunk.split(index); // Update the position of the original chunk this.byEnd[index] = chunk; // Update the position of the new chunk this.byStart[index] = newChunk; this.byEnd[newChunk.end] = newChunk; // If the original chunk is the last chunk, then the last chunk after splitting is the new chunk. if (chunk === this.lastChunk) this.lastChunk = newChunk; // Save the current chunk being operated on, i.e., newChunk.previous, as the starting position for the next search, optimizing the search steps. this.lastSearchedChunk = chunk; if (DEBUG) this.stats.timeEnd('_split'); return true; }chunk.split
Split the original
chunkoperation. Create a newchunkwith interval [index, this.end], update the interval of the originalchunkto [this.start, index] and content etc., and append the newchunkto the end of the originalchunk, forming a doubly linked list.jsfunction split(index) { const sliceIndex = index - this.start; // Split content. const originalBefore = this.original.slice(0, sliceIndex); const originalAfter = this.original.slice(sliceIndex); // Update the content of the original chunk. this.original = originalBefore; // Instantiate a new chunk, interval [index, this.end]. const newChunk = new Chunk(index, this.end, originalAfter); newChunk.outro = this.outro; this.outro = ''; // Update the interval of the original chunk to [this.start, index]. this.end = index; // The original chunk has been edited and the string length is 0. if (this.edited) { // after split we should save the edit content record into the correct chunk // to make sure sourcemap correct // For example: // ' test'.trim() // split -> ' ' + 'test' // ✔️ edit -> '' + 'test' // ✖️ edit -> 'test' + '' // TODO is this block necessary?... newChunk.edit('', false); this.content = ''; } else { this.content = originalBefore; } // Append newChunk to the end of the original chunk, forming a doubly linked list. newChunk.next = this.next; if (newChunk.next) newChunk.next.previous = newChunk; newChunk.previous = this; this.next = newChunk; // Return the newly created chunk. return newChunk; }After analyzing the implementation of
MagicString.update, the final output is achieved through thetoStringmethod.MagicString.toString Implementation code is as follows:
jsexport default class MagicString { toString() { let str = this.intro; let chunk = this.firstChunk; while (chunk) { str += chunk.toString(); chunk = chunk.next; } return str + this.outro; } }jsexport default class Chunk { toString() { return this.intro + this.content + this.outro; } }It can be clearly seen that the implementation of
toStringis to concatenate theintro,content+outroof allchunkinstances.
Source Code Mapping Principle
Overview:
Process the new source code, parse each
chunkinformationcontentinformation, and get the data stored inrawarray as follows:mdraw = [ ["New source code content line coordinate"]: [ "New source code content column coordinate", "Default index information of source code, starting from 0", "Line coordinate of corresponding source code", "Column coordinate of corresponding source code" ], ... ]Then feed the data in
rawto@jridgewell/sourcemap-codecto execute VLQ base 64 encoding operation processing.jsimport { encode } from '@jridgewell/sourcemap-codec'; encode(raw);To get the
sourceMapinformation of the new code.Specific Implementation:
Then we analyze the implementation principle in detail. We can understand that the source code mapping is generated through the
generateDecodedMapmethod. So let's analyze in detail whatgenerateDecodedMapis doing.jsfunction generateDecodedMap(options) { options = options || {}; const sourceIndex = 0; const names = Object.keys(this.storedNames); const mappings = new Mappings(options.hires); // Through locate, we can quickly get the [row, column] information of the source code corresponding to the index with log complexity. const locate = getLocator(this.original); if (this.intro) { mappings.advance(this.intro); } // Traverse each chunk after this.firstChunk. this.firstChunk.eachNext(chunk => { // Get the [row, column] information of the source code corresponding to chunk.start as the index. const loc = locate(chunk.start); if (chunk.intro.length) mappings.advance(chunk.intro); if (chunk.edited) { mappings.addEdit( sourceIndex, chunk.content, loc, chunk.storeName ? names.indexOf(chunk.original) : -1 ); } else { mappings.addUneditedChunk( sourceIndex, chunk, this.original, loc, this.sourcemapLocations ); } if (chunk.outro.length) mappings.advance(chunk.outro); }); return { file: options.file ? options.file.split(/[/\\]/).pop() : undefined, sources: [ options.source ? getRelativePath(options.file || '', options.source) : options.file || '' ], sourcesContent: options.includeContent ? [this.original] : undefined, names, mappings: mappings.raw, x_google_ignoreList: this.ignoreList ? [sourceIndex] : undefined }; } function getLocator(source) { const originalLines = source.split('\n'); const lineOffsets = []; // According to the \n in the source code, split the source code into multiple lines, and lineOffsets records the starting character position of each line. for (let i = 0, pos = 0; i < originalLines.length; i++) { lineOffsets.push(pos); pos += originalLines[i].length + 1; } // Get the code row and column position corresponding to the index character through binary search with log complexity. return function locate(index) { let i = 0; let j = lineOffsets.length; while (i < j) { const m = (i + j) >> 1; if (index < lineOffsets[m]) { j = m; } else { i = m + 1; } } const line = i - 1; const column = index - lineOffsets[line]; return { line, column }; }; }From the above source code, it can be seen that when processing
chunkintroandoutrocontent,Mappings.advancemethod is used; whenchunkis edited,Mappings.addEditis called, and when it is not edited,Mappings.addUneditedChunkmethod is called. Let's first take a look at whatMappings.advanceis doing:jsexport default class Mappings { constructor(hires) { this.hires = hires; this.generatedCodeLine = 0; this.generatedCodeColumn = 0; this.raw = []; this.rawSegments = this.raw[this.generatedCodeLine] = []; this.pending = null; } advance(str) { if (!str) return; const lines = str.split('\n'); if (lines.length > 1) { for (let i = 0; i < lines.length - 1; i++) { this.generatedCodeLine++; this.raw[this.generatedCodeLine] = this.rawSegments = []; } this.generatedCodeColumn = 0; } this.generatedCodeColumn += lines[lines.length - 1].length; } }It should be noted that for
chunkintroandoutro, no [row, column] coordinates of the corresponding source code are recorded in theadvancefunction, and no mapping processing is done inadvancefunction, which only ensures the accuracy of obtaining the [row, column] coordinates of the newcontent.If
chunkhas been edited, we can see whatMappings.addEditis doing.jsexport default class Mapping { addEdit(sourceIndex, content, loc, nameIndex) { if (content.length) { let contentLineEnd = content.indexOf('\n', 0); let previousContentLineEnd = -1; while (contentLineEnd >= 0) { const segment = [ this.generatedCodeColumn, sourceIndex, loc.line, loc.column ]; if (nameIndex >= 0) { segment.push(nameIndex); } this.rawSegments.push(segment); this.generatedCodeLine += 1; this.raw[this.generatedCodeLine] = this.rawSegments = []; this.generatedCodeColumn = 0; previousContentLineEnd = contentLineEnd; contentLineEnd = content.indexOf('\n', contentLineEnd + 1); } const segment = [ this.generatedCodeColumn, sourceIndex, loc.line, loc.column ]; if (nameIndex >= 0) { segment.push(nameIndex); } this.rawSegments.push(segment); this.advance(content.slice(previousContentLineEnd + 1)); } else if (this.pending) { this.rawSegments.push(this.pending); this.advance(content); } this.pending = null; } }It can be clearly seen that only a new
contentcorresponding to the source code position is mapped. Then let's compare the difference ifcontenthas not been edited.jsfunction addUneditedChunk( sourceIndex, chunk, original, loc, sourcemapLocations ) { let originalCharIndex = chunk.start; let first = true; // when iterating each char, check if it's in a word boundary let charInHiresBoundary = false; while (originalCharIndex < chunk.end) { if ( this.hires || first || sourcemapLocations.has(originalCharIndex) ) { const segment = [ this.generatedCodeColumn, sourceIndex, loc.line, loc.column ]; if (this.hires === 'boundary') { // in hires "boundary", group segments per word boundary than per char if (wordRegex.test(original[originalCharIndex])) { // for first char in the boundary found, start the boundary by pushing a segment if (!charInHiresBoundary) { this.rawSegments.push(segment); charInHiresBoundary = true; } } else { // for non-word char, end the boundary by pushing a segment this.rawSegments.push(segment); charInHiresBoundary = false; } } else { this.rawSegments.push(segment); } } if (original[originalCharIndex] === '\n') { loc.line += 1; loc.column = 0; this.generatedCodeLine += 1; this.raw[this.generatedCodeLine] = this.rawSegments = []; this.generatedCodeColumn = 0; first = true; } else { loc.column += 1; this.generatedCodeColumn += 1; first = false; } originalCharIndex += 1; } this.pending = null; }It can be seen that the principle is similar to that of the edited
chunkabove, which is to get the mapping of the newchunkcontentto the source code. The difference is that the uneditedchunkdoes some additional operations, such as precise mapping whenhireandsourcemapLocationsare present.