Deploying a Github Page Site
Goals
- Automatically deploy the
github pagesite when code is pushed. - Use a custom domain name (not the
{username}.github.iodomain, whereusernameis your GitHub account name). - Use
CDNto accelerate resources and improve user access speed.
Implementation
Automatic GitHub Page Deployment
For github page deployment, GitHub provides two solutions:
Using custom build workflow (
workflow) for buildingGithub ActionsVitepressofficially provides a way to deploygithub pageusingGithub Actions. Click View Details for more information. Add ayamlmodule (.github/workflows/deploy.yml) in the project root directory:yamlname: Deploy on: workflow_dispatch: {} push: branches: - main jobs: deploy: runs-on: ubuntu-latest permissions: contents: read pages: write id-token: write environment: name: github-pages url: ${{ steps.deployment.outputs.page_url }} steps: - uses: actions/checkout@v3 with: fetch-depth: 0 - uses: actions/setup-node@v3 with: node-version: 16 cache: npm - run: npm ci - name: Build run: npm run docs:build - uses: actions/configure-pages@v2 - uses: actions/upload-pages-artifact@v1 with: path: docs/.vitepress/dist - name: Deploy id: deployment uses: actions/deploy-pages@v1Note the following in the above
yamlmodule: line6(executes GitHub workflow when local code is pushed to themainbranch), line27(GitHub workflow executes thenpm run docs:buildscript to build the repository), and line31(publishes the built artifacts from path:docs/.vitepress/dist). These can be modified according to your project's needs. The current project's modified configuration module is as follows:yamlname: Deploy on: workflow_dispatch: {} push: branches: - main // [!code --] - master // [!code ++] jobs: deploy: runs-on: ubuntu-latest permissions: pages: write id-token: write environment: name: github-pages url: ${{ steps.deployment.outputs.page_url }} steps: - name: Checkout uses: actions/checkout@v3 - name: Install pnpm uses: pnpm/action-setup@v2 // [!code ++] with: version: 7 // [!code ++] - name: Setup node uses: actions/setup-node@v3 with: node-version: 16 cache: 'pnpm' - name: Install dependencies run: pnpm install --frozen-lockfile // [!code ++] - name: Build run: npm run docs:build // [!code --] run: pnpm build // [!code ++] - uses: actions/configure-pages@v2 - uses: actions/upload-pages-artifact@v1 with: path: docs/.vitepress/dist // [!code --] path: .vitepress/dist // [!code ++] - name: Deploy id: deployment uses: actions/deploy-pages@v1Since
pnpmhas fast dependency installation speed and efficient disk space utilization, we usepnpmas the package manager inworkflows. Note that thepnpmpackage manager is not pre-installed in the GitHub Actions runner image (unlike npm and yarn). Therefore, the workspace needs to includepnpm/action-setupto installpnpm. The--frozen-lockfilemode is used for installing dependencies, so thepnpmversion used inworkflowsneeds to match the version used when generatingpnpm-lock.yaml(in this project, it'sv7.0). Also note thatyaml- name: Install pnpm uses: pnpm/action-setup@v2 with: version: latestThe latest version of
pnpmcorresponds topnpm 8.0.0.So the project's
workflowsis quite clear. Every time code is pushed to themasterbranch, the GitHub workflow will automatically execute, installingpnpmversion7.0, determining thenodeversion (v16), installing project dependencies, and then executing thepnpm buildcommand to build the current repository. The successfully built artifacts from the path.vitepress/distwill be uploaded and automatically deployed to thegithub pagesite, which can then be accessed through the{username}.github.iostatic page.Automatic deployment through branches
Custom Domain Configuration
Purchase the desired custom domain through Tencent Cloud (using
vrite.cnas an example).Go to DNS Resolution DNSPod to add resolution records for the
vrite.cndomain.Add a
CNAME record(recommended) or 4A recordsin the domain resolution.CNAME recordinformation:
Host Record Record Type Record Value www CNAME xisenao.github.io A recordinformation:
Host Record Record Type Record Value www A 185.199.108.153 www A 185.199.109.153 www A 185.199.110.153 www A 185.199.111.153 GitHub Domain Binding
In the current deployment repository's
Settings->Pages->Custom domain, fill in the configured custom domain (www.vrite.cn). Check theEnforce HTTPSoption below (After May 1, 2018, GitHub Pages has started providing free HTTPS functionality for custom domains, and has greatly simplified the operation process. Users no longer need to provide their own certificates, they just need to point their domain to their GitHub Pages domain using CNAME.).
At this point, you can access the github page site through https://www.vrite.cn.
CDN Acceleration
Configuration Principle
The original access path was domain -> DNS server -> Github server. Now we add a layer of CDN server to connect the entire process, so the access path becomes domain -> DNS server -> CDN server -> Github server. To implement such a chain, we need to establish the mapping relationship between DNS server -> CDN server and CDN server -> Github server. We also need to enable the CDN server.
Using Tencent Cloud as an example:
Enable
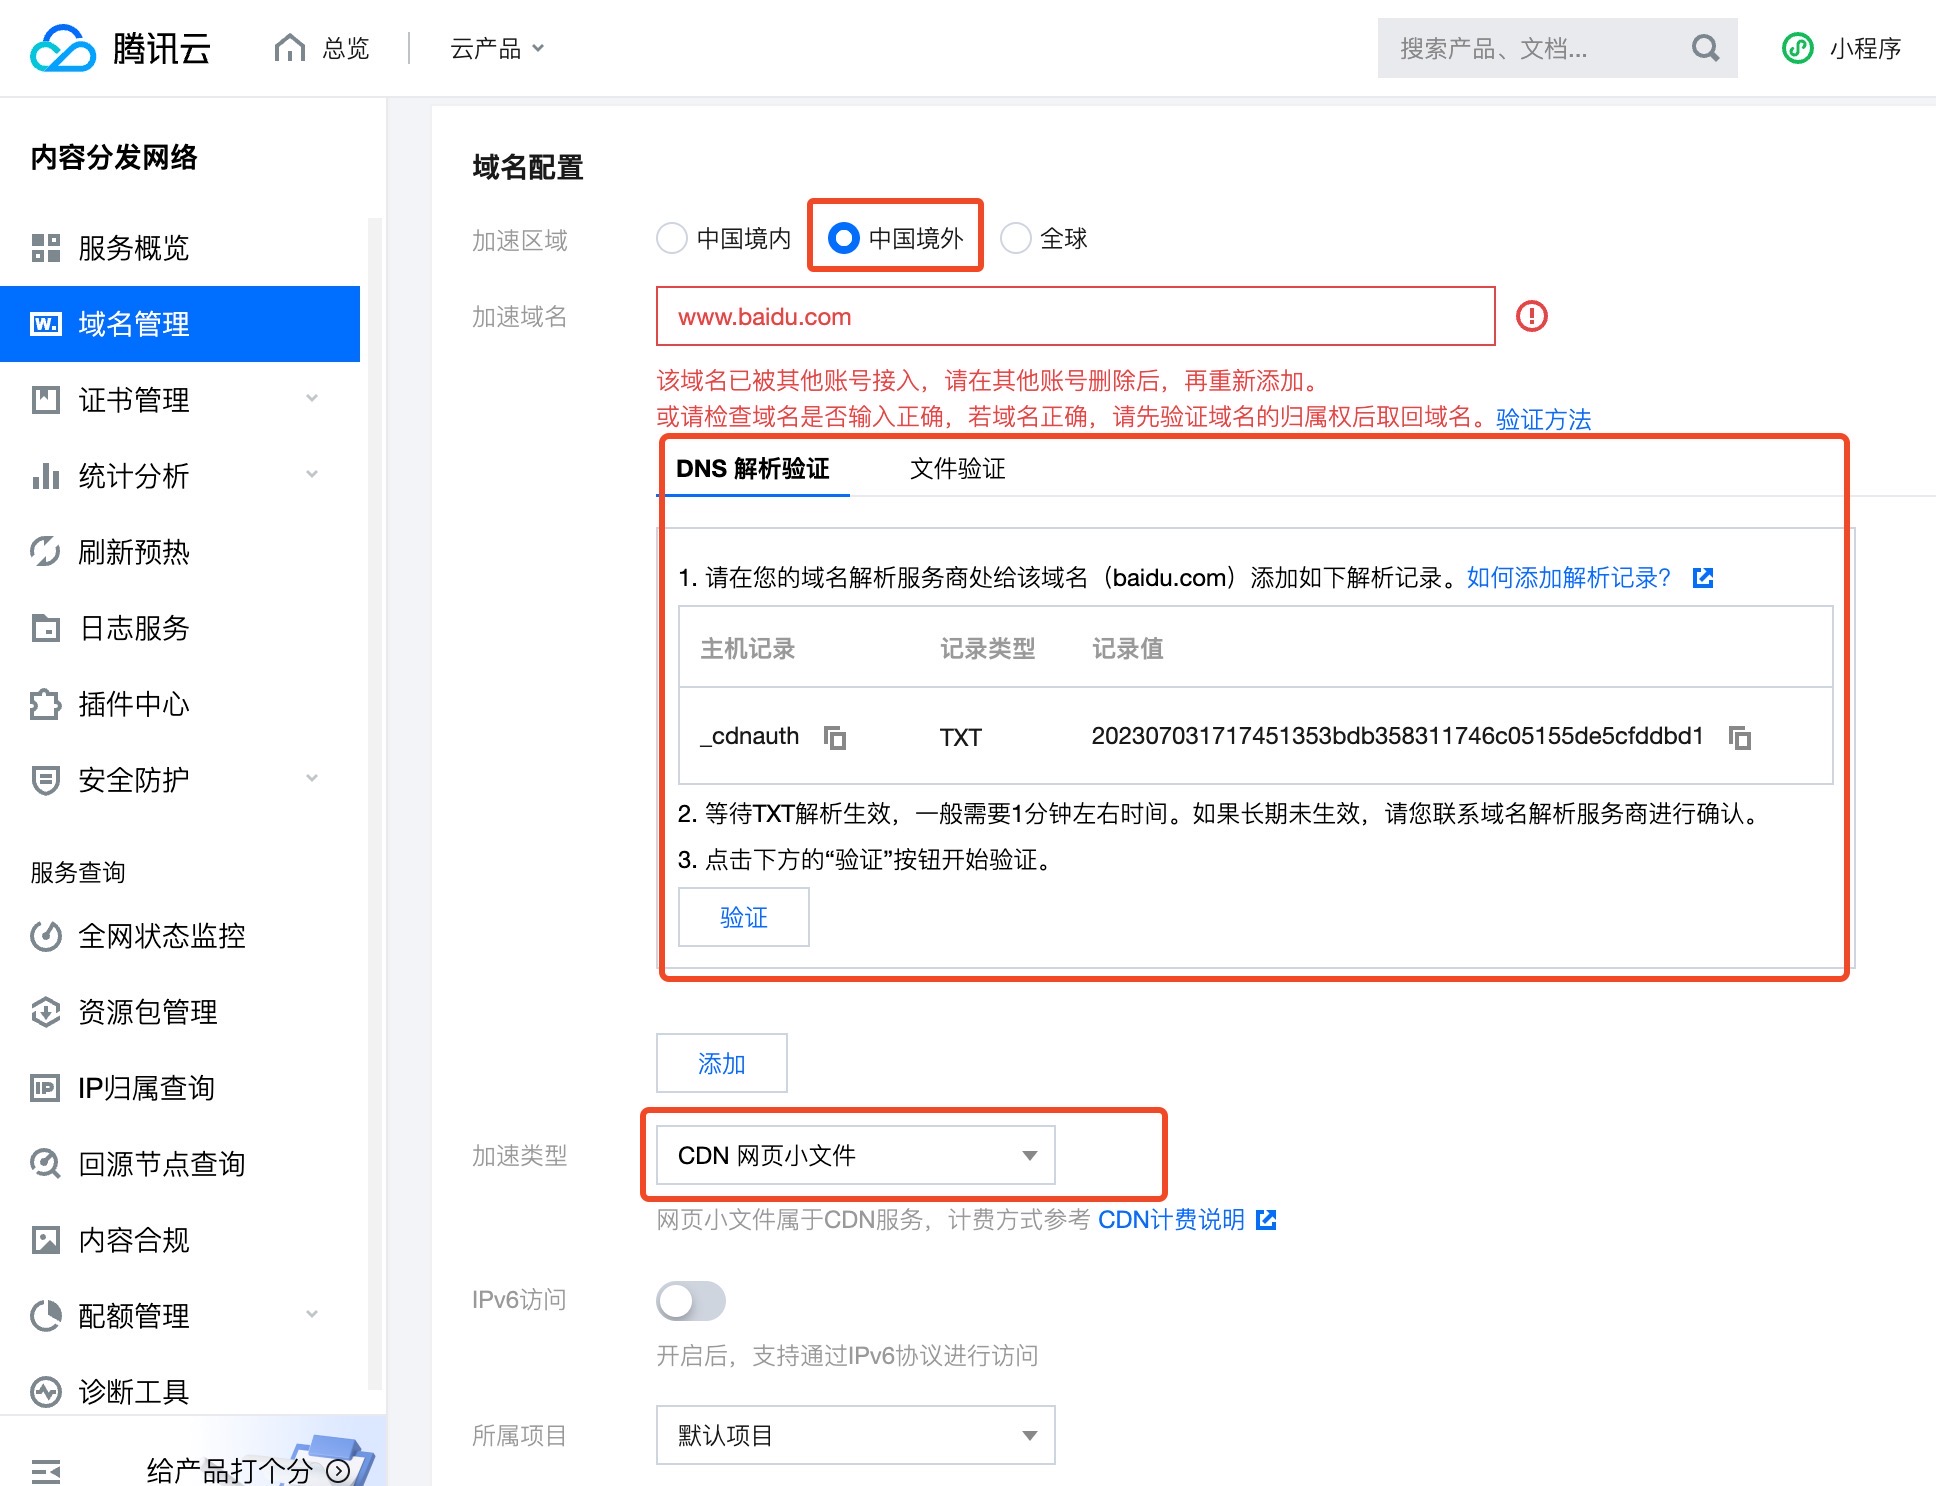
CDN serverAdd an accelerated domain in
Domain Management
Worth mentioning
- The added domain needs to be verified. Tencent provides two methods to confirm domain ownership:
TXT Record DNS Resolution VerificationandFile Verification. - Domains with acceleration regions outside China (users accessing from outside China, including Hong Kong, Macau, Taiwan, etc.) do not require ICP filing. However, domains with acceleration regions as
Mainland China(users accessing from within China) orGlobal(users accessing from both within and outside China) require ICP filing. - When accessing a single domain, you need to accelerate both
www.vrite.cnandvrite.cndomains, meaning you need to configure twice. This is because when accessingvrite.cn,githubwill automatically redirect towww.vrite.cn, and the certificate configured onvrite.cncannot be used on thewww.vrite.cnsubdomain. Therefore, if you only configure the certificate forvrite.cn, accessingwww.vrite.cnwill show that the site certificate is invalid.
- The added domain needs to be verified. Tencent provides two methods to confirm domain ownership:
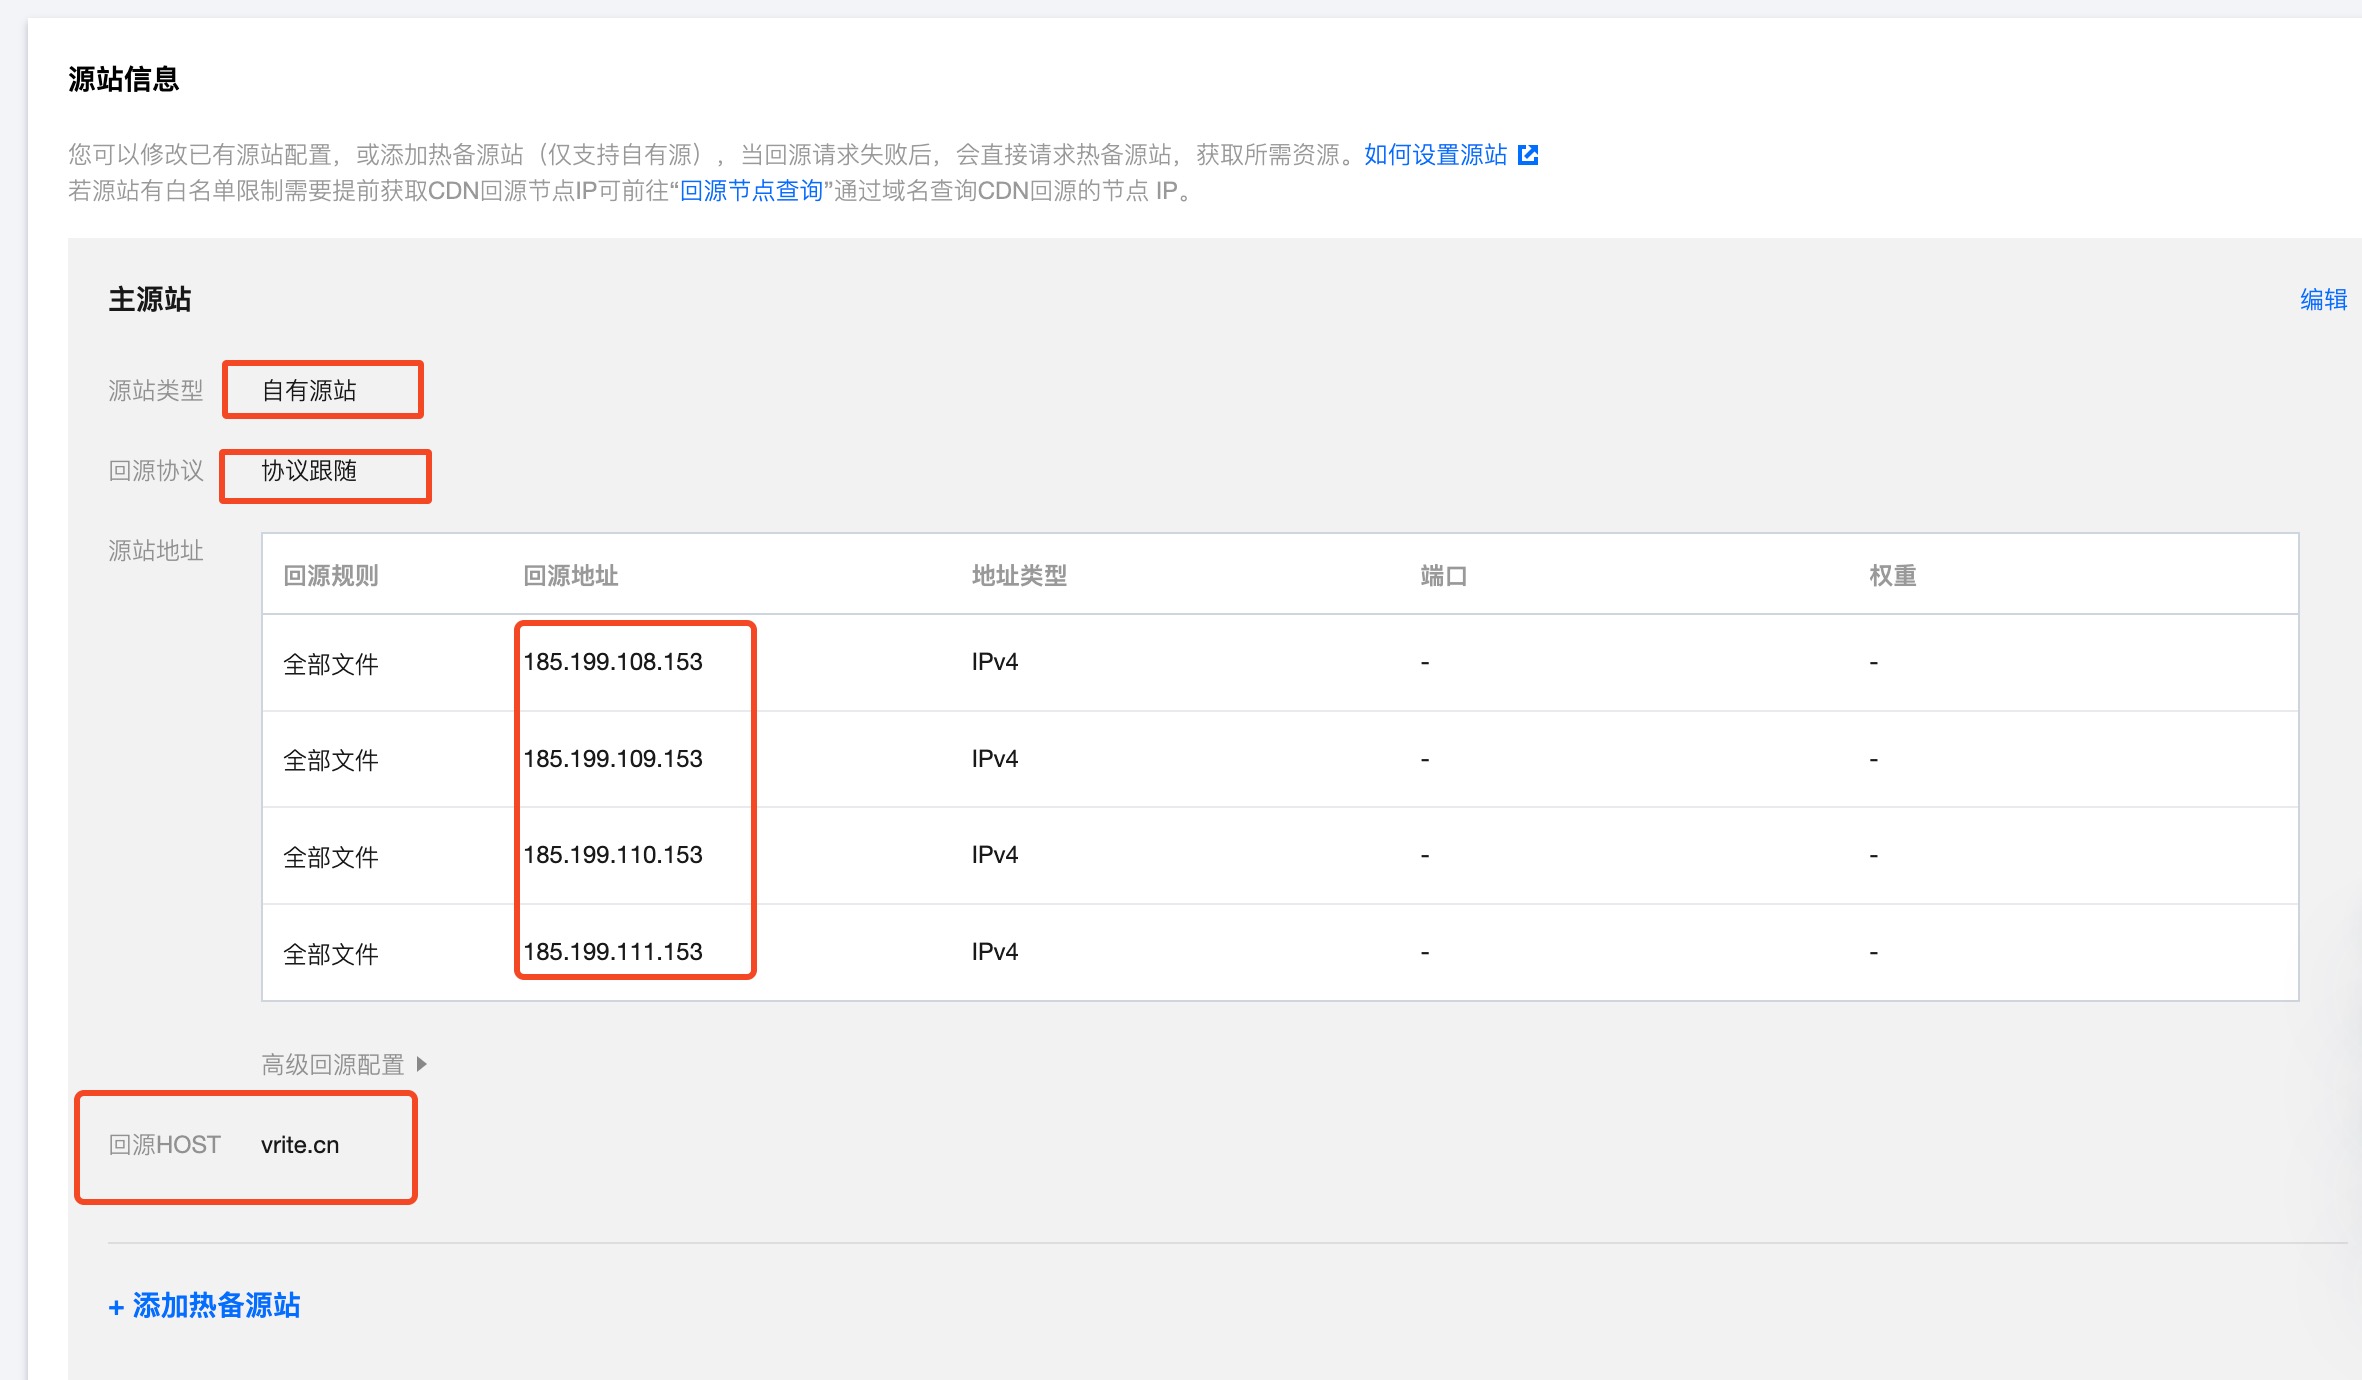
CDN server->Github serverconfigurationFill in the origin server information (server address to be accelerated) as follows

After configuring the
cdn, you will get thecnameaddress provided by thecdn
DNS server->CDN serverconfiguration
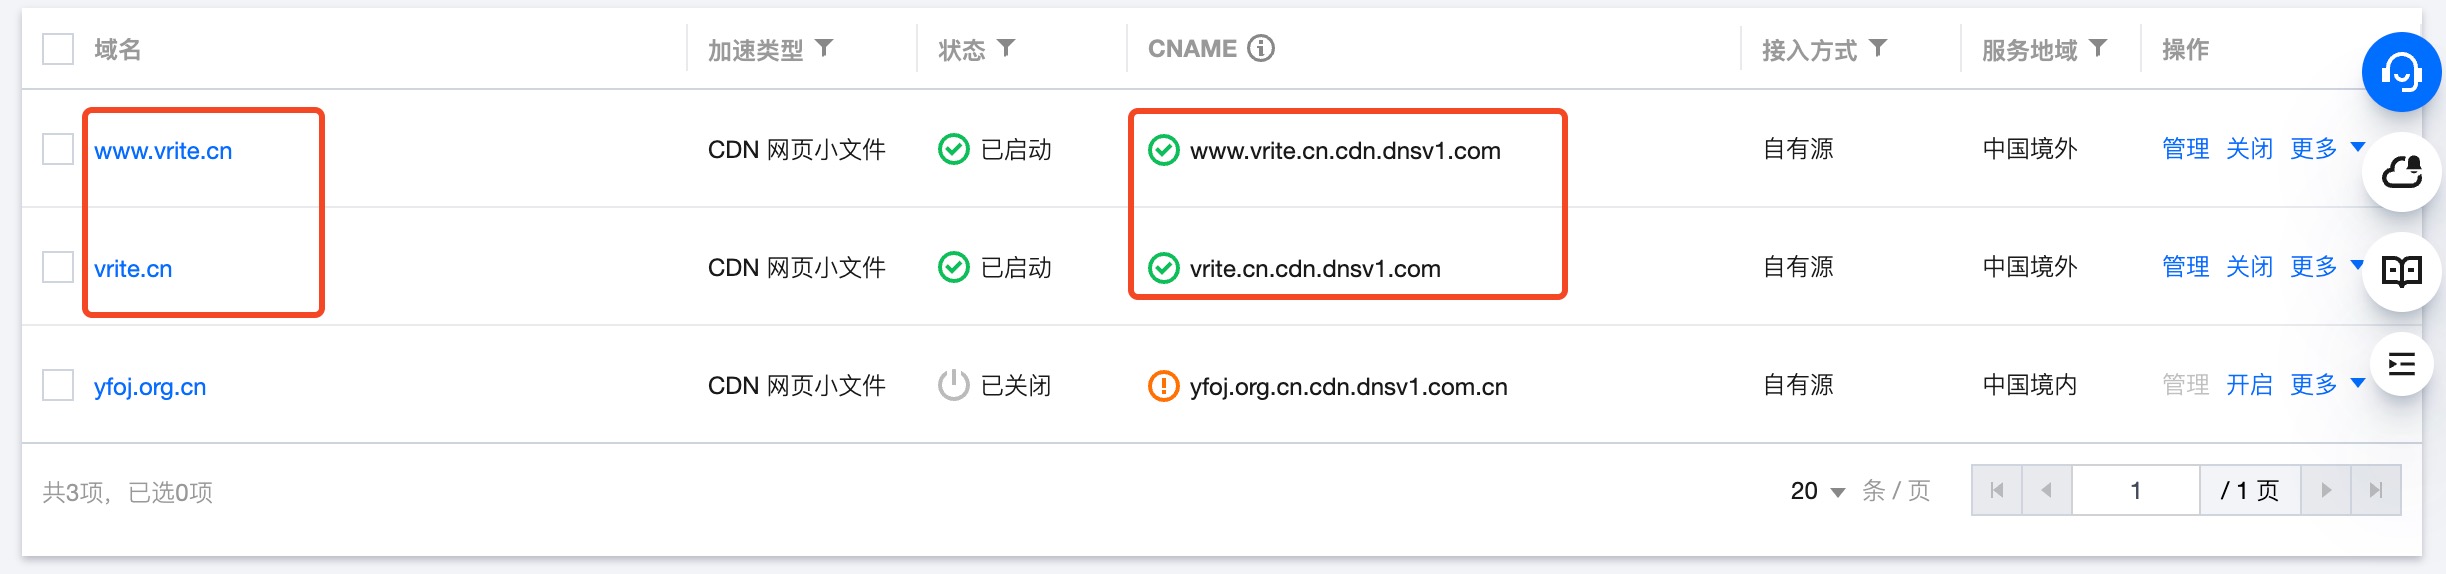
Add a CNAME record in the domain's DNSPod, other records can be deleted.


Configure certificates for vrite.cn and www.vrite.cn
Tencent Cloud can apply for 50 free certificates. The domain verification method in the certificate application defaults to Automatic DNS Verification, but during this application process, it was found that the automatic addition of CNAME records in DNSPod kept failing verification, and it was later approved by manual customer service (reason not disclosed). For future applications, consider the other two verification methods: Manual DNS Verification and File Verification. The certificate can be approved within 24 hours, after which you can add certificates for both domains.

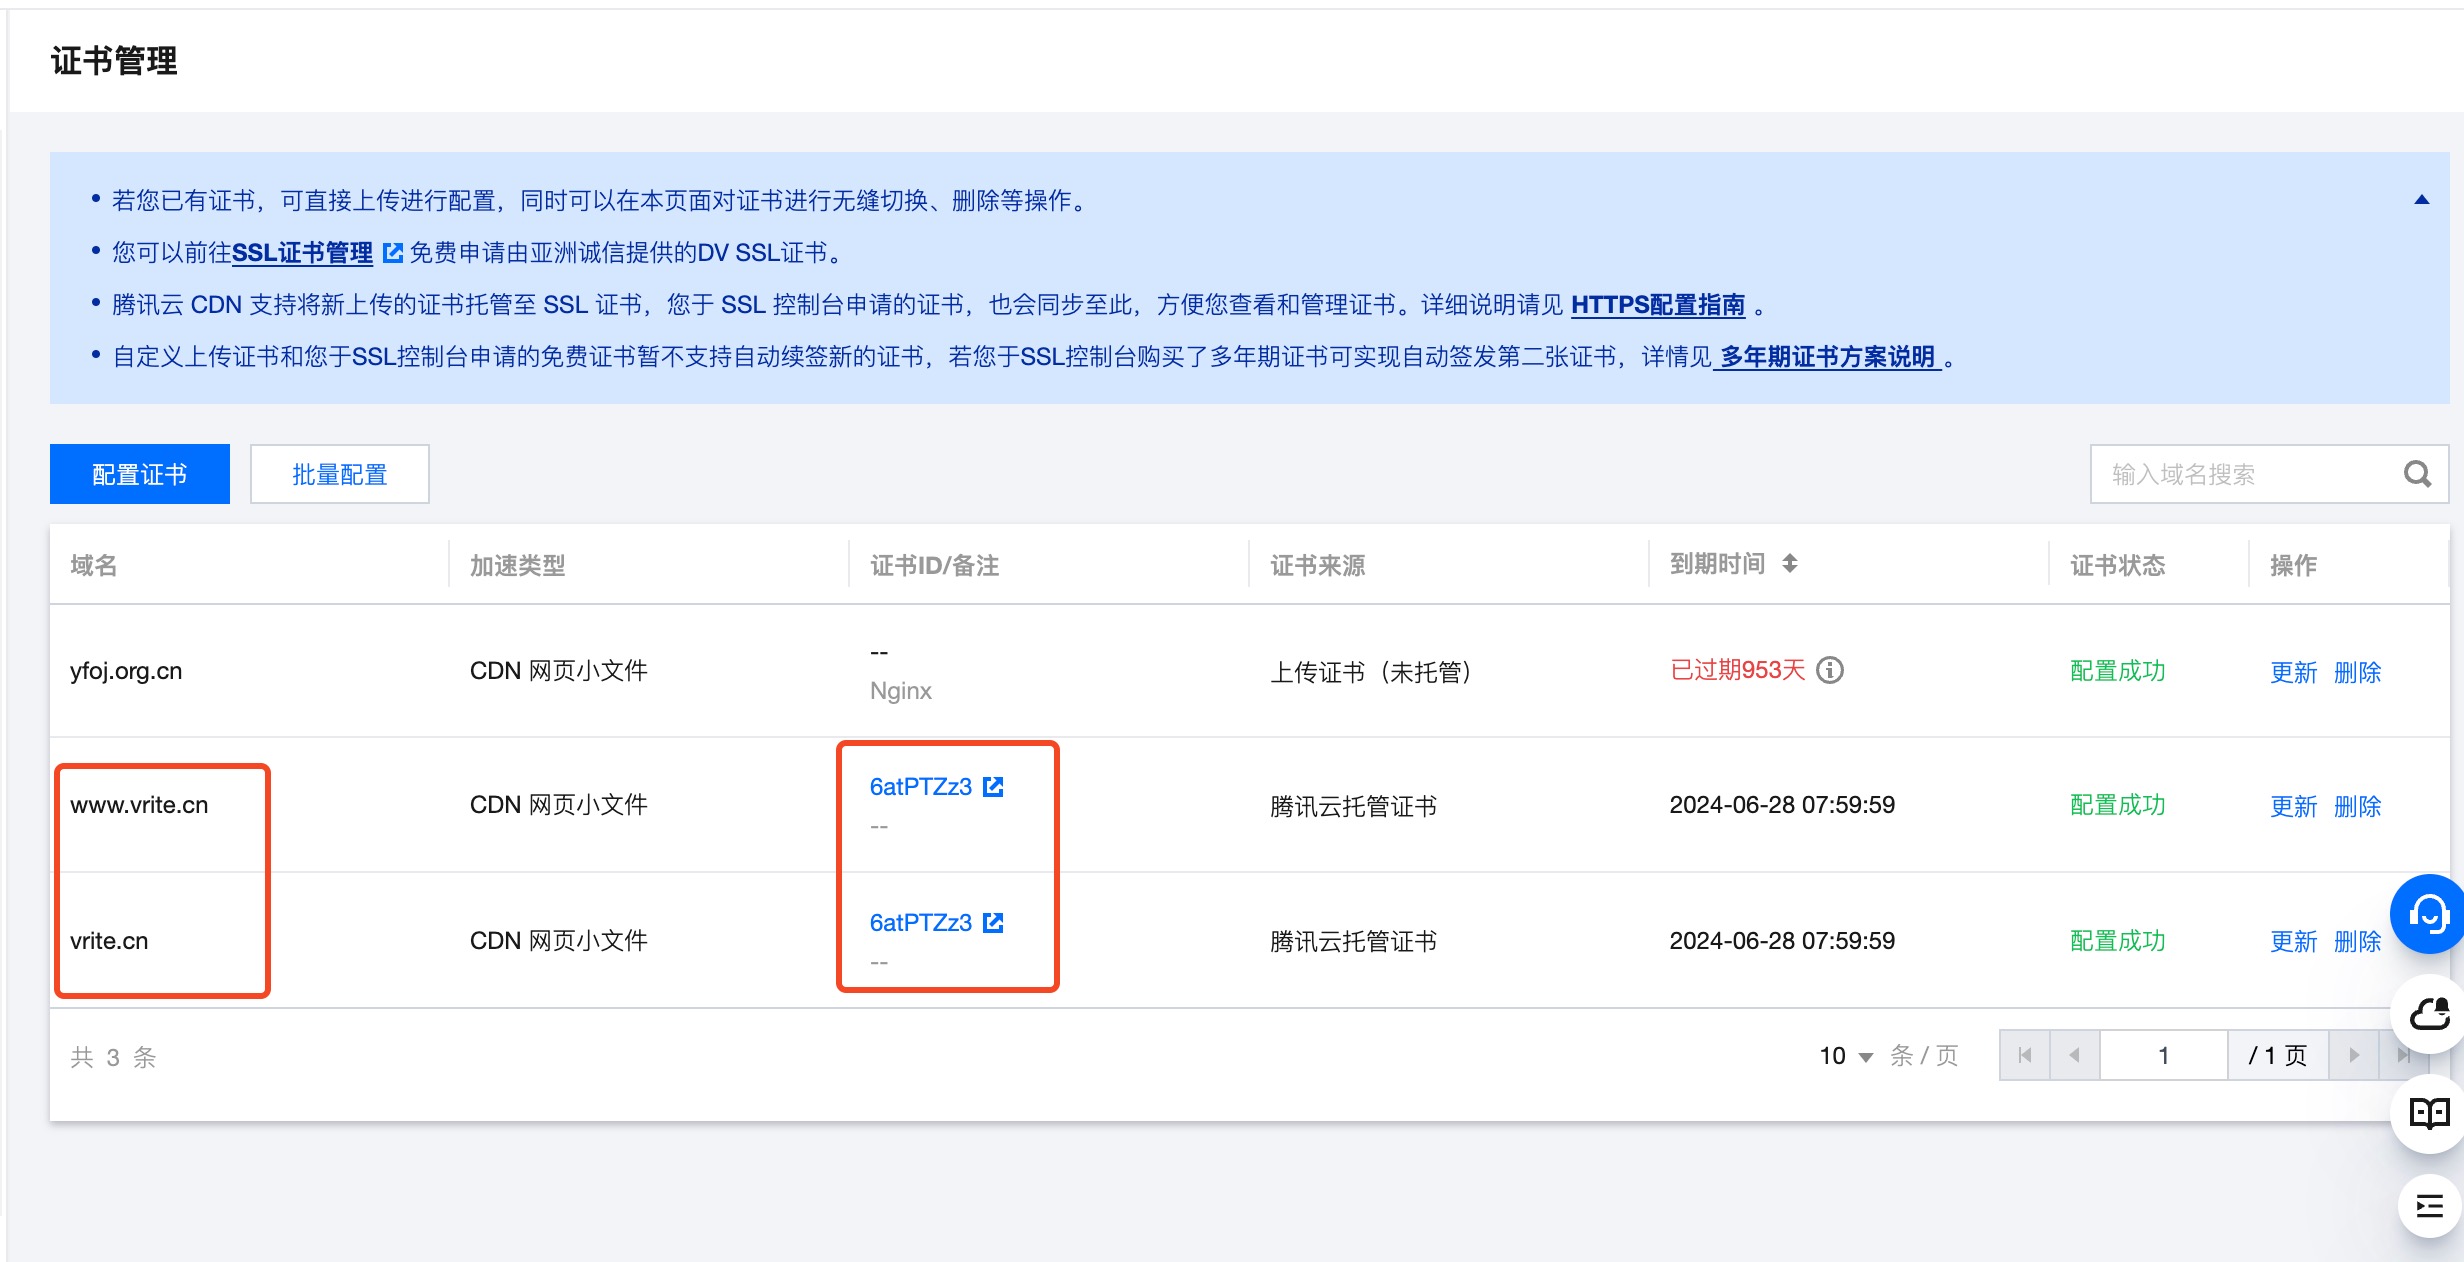
After configuration, the site should be accessible normally after a while.
WARNING
Found an issue: when the CDN is in arrears, the certificate will also become invalid. Therefore, after payment, you can click the Update button on the right to reset the certificate.